Introducing Evervault Page Protection: Securing payment pages from JavaScript attacks
Secure your payment pages against script and security header attacks while complying with PCI DSS 4.0 requirements, 6.4.3, and 11.6.1.


In Why We Built Cages, we mentioned that deploying a server into an enclave proved difficult within a production environment. After setting up the build process for Cages, we aimed to improve the deployment process.
The deployment process entails uploading, building, and deploying the Cage. In this post, we will outline the architecture of a Cage, then explain what happens behind the scenes during a Cage deployment. When you deploy a Cage, you will see these status updates from the Cages CLI, which summarizes the steps involved:
1[INFO] Deploying Cage with the following attestation measurements: {
2HashAlgorithm": "Sha384 { ... }",
3"PCR0": "...",
4"PCR1": "...",
5"PCR2": "...",
6"PCR8": "..."
7}
8[INFO] Cage zipped.
9[INFO] Cage uploaded to Evervault.
10[INFO] Cage built on Evervault!
11[INFO] Cage deployed!
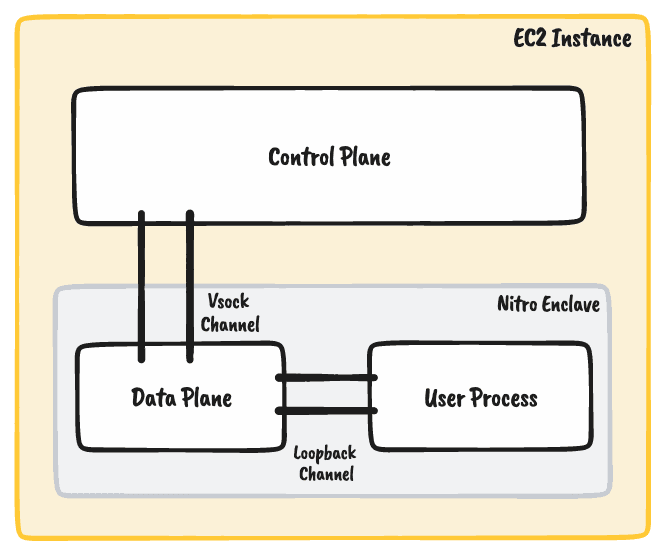
12[INFO] Your Cage is now available at https://[cage-name].[evervault-app].cages.evervault.comTo understand a Cage deployment, it’s important to recognize the components that make up a Cage. As mentioned in the Building Enclaves Locally Post, there are three parts to a cage: The control plane, the data plane, and the user process.

The only way to communicate with an enclave is through a Vsock channel from the parent EC2 instance. The control plane is a Rust application deployed on the parent instance, and it handles connecting to the enclave over Vsock. The control plane is essential for routing traffic in and out of the enclave, handling scaling events, and providing health checks.
The data plane is a Rust application that runs inside the enclave and manages Vsock connections to and from the parent instance. Its role is to handle traffic passing in and out of the enclave. The data plane has several roles. It handles forwarding ingress and egress traffic in and out of the enclave, provides TLS termination within the enclave, and also is responsible for injecting configuration for the user process (managing environment variables, enabling logging and metrics). The data plane is written by Evervault and downloaded during build time.
The user process is the application written by the user that will run inside the enclave. It connects to the data plane over loopback and doesn't require Vsock support: This means it can be written as a standard web server in any programming language.
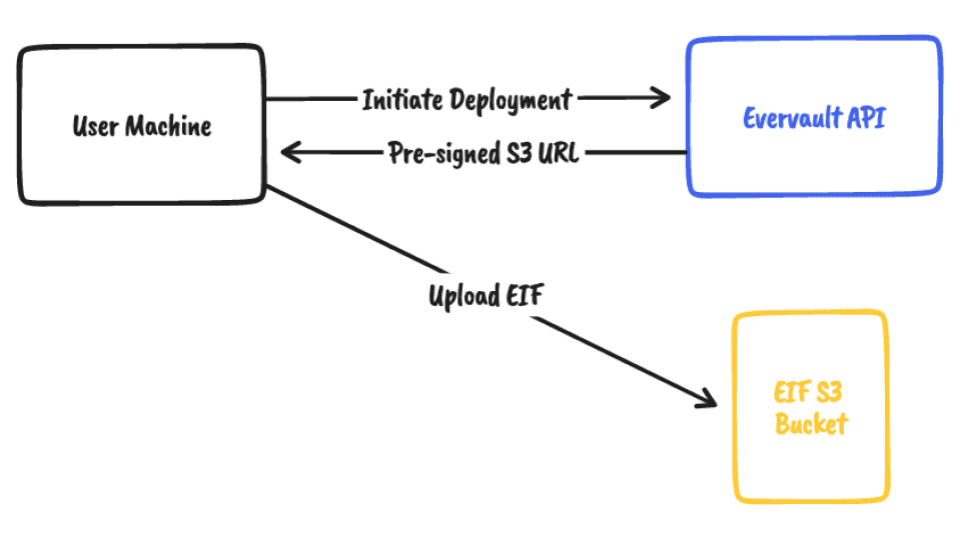
Once the Enclave Image File (EIF) has been built on your local machine, the next step is to upload it to our infrastructure. When you run `ev-cage deploy`, it triggers a request to the Evervault API, which returns a pre-signed S3 URL for the CLI to upload to our S3 bucket. The EIF is zipped and securely uploaded to the bucket, where it is encrypted at rest.

Once we have the EIF; our next move is to bundle the EIF into an image with the Control Plane. For Cages, we need to produce a Docker image that first launches the enclave on the parent instance and then starts up the control plane inside a container.
Initially, we planned to execute a custom Fargate task that uses Docker to build the image, but Fargate's security constraints prohibited it (for valid security reasons). This is where Kaniko came into play. Kaniko allows us to build container images from a Dockerfile, inside a container.
When an EIF is uploaded to S3, we execute Kaniko which retrieves the latest version of the control plane and packages it into an image with the user’s EIF. When run, the image initiates a script that first boots the enclave and then proceeds to initialize the Control Plane. This image is then uploaded to our docker image repository.
After building the image on our infrastructure, we begin deployment. This involves creating several interdependent pieces of infrastructure to deploy, and run the Cage programmatically. For example, we need to ensure that EC2 instances are operational and stable before setting up DNS records to route traffic to the Cage.
To implement this logic, we utilized AWS Step Functions, which gave us access to AWS APIs and observability into the complex deployment flow.
Some of the key components of the step function include access to input metadata, auto scaling groups, Elastic Container Service (ECS) clusters with discovery and routing, and status updates.
The step function is initiated through the Evervault API and receives metadata for a Cage deployment, including information such as ID, version, and debug mode. This metadata is leveraged throughout the step function to construct the infrastructure and associate it with the designated Cage.
Cages are designed to be highly available, with multiple instances to ensure resiliency in the event of a failure. To manage Cage instances, we create an EC2 Auto Scaling Group for each Cage using a dedicated Launch Template. This allows us to monitor Cage resources, dynamically scale them up and down as needed, and refresh instances weekly to pull in the latest security updates. The Launch Template which is used, automates registering the instance with an AWS ECS cluster. The instances are tagged per Cage and can then be used as container instances in ECS.
The control plane image is deployed using ECS. We create an ECS Daemon Service which spins up one Cage task per container instance. A placement constraint is set on the ECS Service so that tasks are only placed on the correct container instances. As the instances are scaled up and down, the tasks will scale accordingly.
Once a Cage is deployed, we need to provide an easy way for customers to connect to it. When a deployment is complete, the user is given a hostname for their Cage eg (secret-cage.app-123abc.cages.evervault.com).
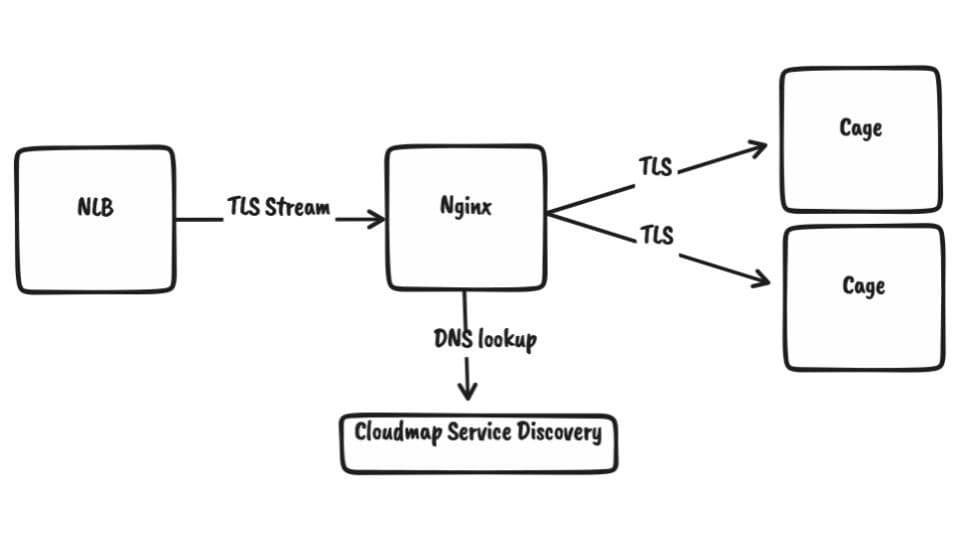
To set up this routing, we create an AWS Cloudmap Service when a Cage is first deployed. This registers the Cage tasks with our internal DNS namespace for Cages. We have a fleet of simple Nginx servers behind a Network Load Balancer. These Nginx instances simply peek at the SNI header of the incoming TLS stream and then forwards the TLS stream to the corresponding internal IPs of the Cage. The internal Cage IP is advertised over internal DNS using AWS Cloudmap.

Throughout the deployment process, we use SNS to send status reports back to the API, where the state of the Cage is updated. This allows the user to monitor the status of their deployment.
After a Cage is deployed, we can provide some level of observability into the traffic hitting a Cage without compromising the security model. Cage transaction logs enable the data plane to record HTTP request metadata such as request path, timings, response code, etc. These logs are shipped to the control plane periodically where they are logged and piped into our Elasticsearch cluster. They can then be viewed in the Evervault dashboard. If a Cage is deployed in debug mode, a user can use the ev-cage logs command to see the logs of their user process in a tail-like interface.
Metrics are also exported from the Cage. The Cage uses statsD to stream metrics into CloudWatch. These metrics are exposed in the Evervault Dashboard. This gives the user more insights into the resources used by a Cage. With this, we plan to soon provide users with the ability to set custom auto-scaling thresholds. For example, a user will be able to configure their Cage so it will scale up when the CPU is greater than a specified value.
To maintain the security of Cages, the underlying instances receive the latest security patches weekly. Each week, new instances are started for each Cage with the latest built Amazon Machine Image.
Deploying and managing an Enclave in a production environment is a complex process. As developers, we understand the significance of having a smooth server deployment process, and we believe that the deployment of Trusted Execution Environments should not be any different. See how it works and sign up for the beta here to deploy your first Cage.