Introducing Evervault Page Protection: Securing payment pages from JavaScript attacks
Secure your payment pages against script and security header attacks while complying with PCI DSS 4.0 requirements, 6.4.3, and 11.6.1.


Enclaves is a product that enables companies to run their security-critical workloads in bulletproof environments. Enclaves also empowers the end-user to verify exactly how their personal data is being used. We haven’t yet presented a thorough guide of how to structure a product that uses Enclaves. That is what we aim to do in this post, by building a mock key sharing product, making use of Evervault’s latest technologies to achieve a state-of-the-art trust model which combines security with usability.
Here's a quick overview of what we'll cover:
Whether you're new to Enclaves or looking to deepen your understanding, this guide aims to be comprehensive and accessible for all.
Let’s begin by explaining the problem we’ll be using Enclaves to solve.
Private keys and passwords must be managed with care, but some carry more weight than others. I don’t care that much if someone finds the password to my childhood Runescape account, because the potential loss to me is a virtual currency which I haven’t used in over a decade. If my bank account gets hacked, the potential loss is just time and energy. I’d give my bank a phone call and they’d replace the money stolen by fraud. However, if my crypto wallet gets hacked, the potential loss is the total funds in the wallet. In my case, this isn’t much, but for some this could be thousands or millions of dollars worth of virtual currency. And if that money leaves the wallet, there’s no phone call that will get it back.
These wallets are protected by private keys. To transfer money out of the wallet, you need to place a virtual signature on the intended transaction using the private key. Without this virtual signature, and without the private key, the transfer can’t go through. If a cybercriminal finds your private key, they can sign any transaction they want, which is usually as large a transaction as they can make. So the private key is effectively worth the total balance of the wallet.
Imagine you are given a wallet with $1 million in it, and someone hands you the private key in an envelope. How will you keep the key private? Would you store it in a file on your computer? What if the computer gets hacked, or goes on fire? Would you store it in a file under your bed? What if someone finds it, or the fire from your computer spreads to your bed?
Not only do you need to keep the key safe, but you need to keep yourself safe. Remember that the key is effectively worth the balance in the wallet. Do you keep anything else worth $1 million under your bed? Even if it’s not under your bed, a thief knows that you have it in your possession somewhere, and that threatening you, or worse, could force it out of your possession.
One common solution is to share the key. There are cryptographic methods such as Shamir’s Secret Sharing scheme which allow you to split a key into multiple parts, giving each part to a different person. You could keep one part yourself, give the second part to your mother, and give the third part to a priest. Then you destroy the original private key. When you want to transfer some of the money, you need to first meet up as a trio and combine the shares to reproduce it. Although somewhat inconvenient, this method works.
If you originally received the private key on a piece of paper, it is easy to destroy. You could just set it on fire. But that means someone had to give you the piece of paper with the key on it. So you’d also need to trust them entirely. To avoid placing $1 million of trust in that person, you could generate the key yourself on your computer. Destroying the key on your computer isn’t as simple as burning it though. If an attacker has infiltrated your device, they could already have it by the time you’ve “destroyed” it. Ahhh this just isn’t worth it!
By now you may wish that you’d never received the imaginary $1 million wallet at all, because your initial dreams of being able to pay rent in Dublin are no longer worth the stress of figuring out how you can manage this key without putting your loved ones at risk. Thankfully, the product we’re going to develop in the remainder of this post allows the user to never see the private key, while also verifying that no one else can, while also being able to make transactions. Deep exhale!
Our solution will involve the user interacting with a hypothetical company who is responsible for managing the wallet generation and transaction process, while creating a good user experience. This will be a mock version of say Binance or Crypto.com — think “official crypto provider” of your favourite sports franchise, because they all need one now for some reason. We’ll just call it the “Provider” for now. If the Provider is generating the keys and signing transactions, they need to first gain the trust of the user. When there’s lots of money involved, this trust should be gained through proof, not reputation.
The Provider will use the secret sharing method we discussed before. They’ll need to prove to the user that no one can access the private key. They’ll do this by running their key-generation and transactions server in an Enclave. The Enclave will allow the user to verify what code is running during the key-generation process, using a method called Attestation. Hence, this allows the user to audit that the key is appropriately split and only ever exists in its totality within the Enclave. As Enclaves also have state-of-the-art security to outside attackers, if the private key is only accessible within the Enclave, it will never be accessible to an attacker or to the Provider.
Attestation is the concept of verifying what code has been deployed in the server you are communicating with. The attestation process begins with the Enclave producing an Attestation Document, which is signed using a key that can only be accessed by the Enclave. These documents include measurements of the code running on the machine. When a user communicates with the Enclave, they are first served one of these Attestation Documents. Before the user sends any sensitive data, they verify both that the server is in an Enclave and that it is running the correct code.
It’s like if you have a nut allergy and arrive at a restaurant. On arrival, you receive the menu for the day, which has been signed by the head chef. If the menu (the code) is not what you expected, or you don’t trust the chef (the signature), you can leave the restaurant before putting yourself at risk.
In the design of this proof-of-concept product our highest priority will be to achieve the intended trust model, which is that the user doesn’t need to trust the Provider at all. We will also aim to produce something which is realistic, in that it has the structure of a real product. We don’t recommend this as an exact shippable product, but rather a structure that could be built upon and adapted for other use cases.
The Attestation flow for Enclaves relies on being able to validate fields in a TLS Certificate before sending sensitive data. Typical web browsers such as Chrome don’t allow users, or even browser extensions, to perform extra validation on TLS Certificates. Hence, we won’t be building a typical web app. We’d still like to create a user-friendly experience though, so rather than building a boring command line interface, we’ll create a Mac desktop app. That way, we can demonstrate how companies can build out user applications while still using the Evervault SDK to Attest their Enclaves. Electron is our framework of choice, as this allows us to use NPM packages, and hence the Evervault Node SDK.
The code that runs in the Enclave will need to be open-source (or at least visible to the user) so they can view its measurements for use in Attestation. This code should be kept simple, so that it is easy to audit for both the Provider and the user. Hence, we will only include the logic for key generation and transaction signing in the Enclave, hosting it on a basic Flask server. It is worth noting here that Enclaves are designed to be stateless servers, besides their configuration settings and environment variables. We’ll factor this into our design by having the Enclave communicate with a stateful backend server.
A separate backend server will be deployed which will act as a gatekeeper between the user and the Enclave. The user must first authenticate with the backend before being able to make requests to the Enclave. Having a separate backend demonstrates how you could include closed-source business logic in a backend while still making use of Enclaves for sensitive processes. In our example the backend won’t do much, but it is still useful to include it to demonstrate the combination of a stateful closed-source backend with a stateless open-source Enclave. The backend will be hosted on Replit for simplicity of deployment. Replit DB will be used for storage.
In this section we’ll go into the technical details of the implementation. At the risk of being hyperlink-heavy, we’ve tried to include as many links to the corresponding source code as possible.
The source code for the Enclave must be available to the user for Attestation. As part of the Attestation process, the user extracts the measurements of the Enclave from the received Attestation Document and compares them to the measurements they expected. If the measurements match what they expected, they will trust the Enclave. Hence, the measurements which the user keeps as their reference point are extremely important. If those measurements correspond to virus-riddled code, then the Attestation process is useless.
In this example, we prioritize making it as easy as possible for the user to view the source code of the Enclave and the measurements that correspond to it. The first step is to publish the source code in a public GitHub repo. For deployments a public GitHub Action is used. The measurements, which are officially named Platform Configuration Registers (PCRs), are displayed in the logs of the deployment, viewable by anyone.

Rather than require the user to dig through the logs to view the PCRs, we go a step further. Our Action publishes the latest PCRs to a public JSON endpoint. This allows the Client application to pull in the latest PCRs on startup and display them to the user, along with a link to the corresponding deployment. These up-to-date PCRs are used in requests to the Enclave, rather than hard-coding them in the Client source code.
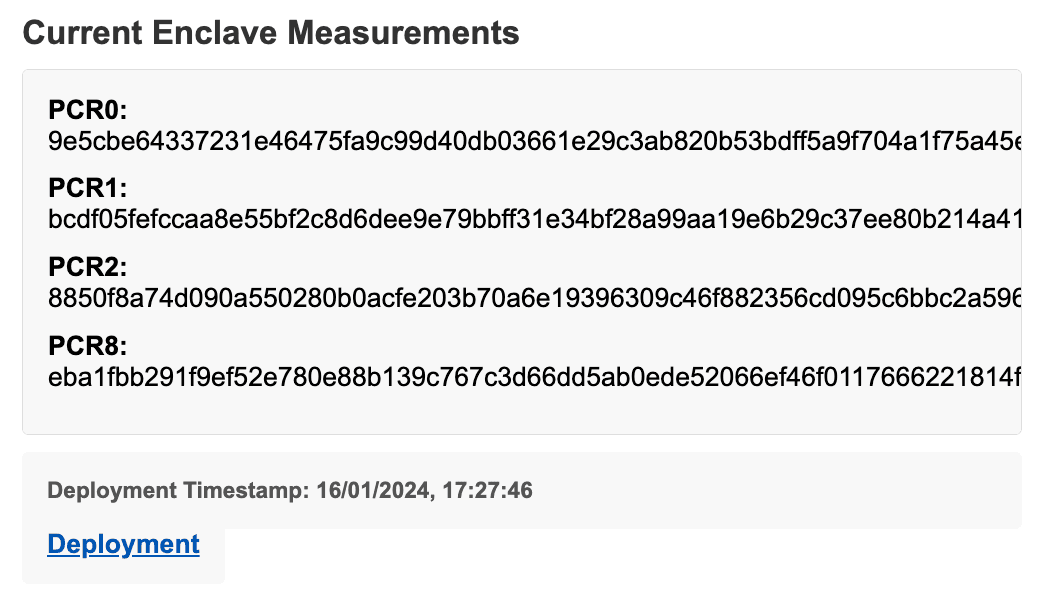
As a bonus, we also show the PCRs in the GitHub README.

The Client application is also open-source. This allows the user to validate that the Evervault SDK is being configured correctly, such that the PCRs pulled in on startup are those that are used for Attestation when making requests to the Enclave.
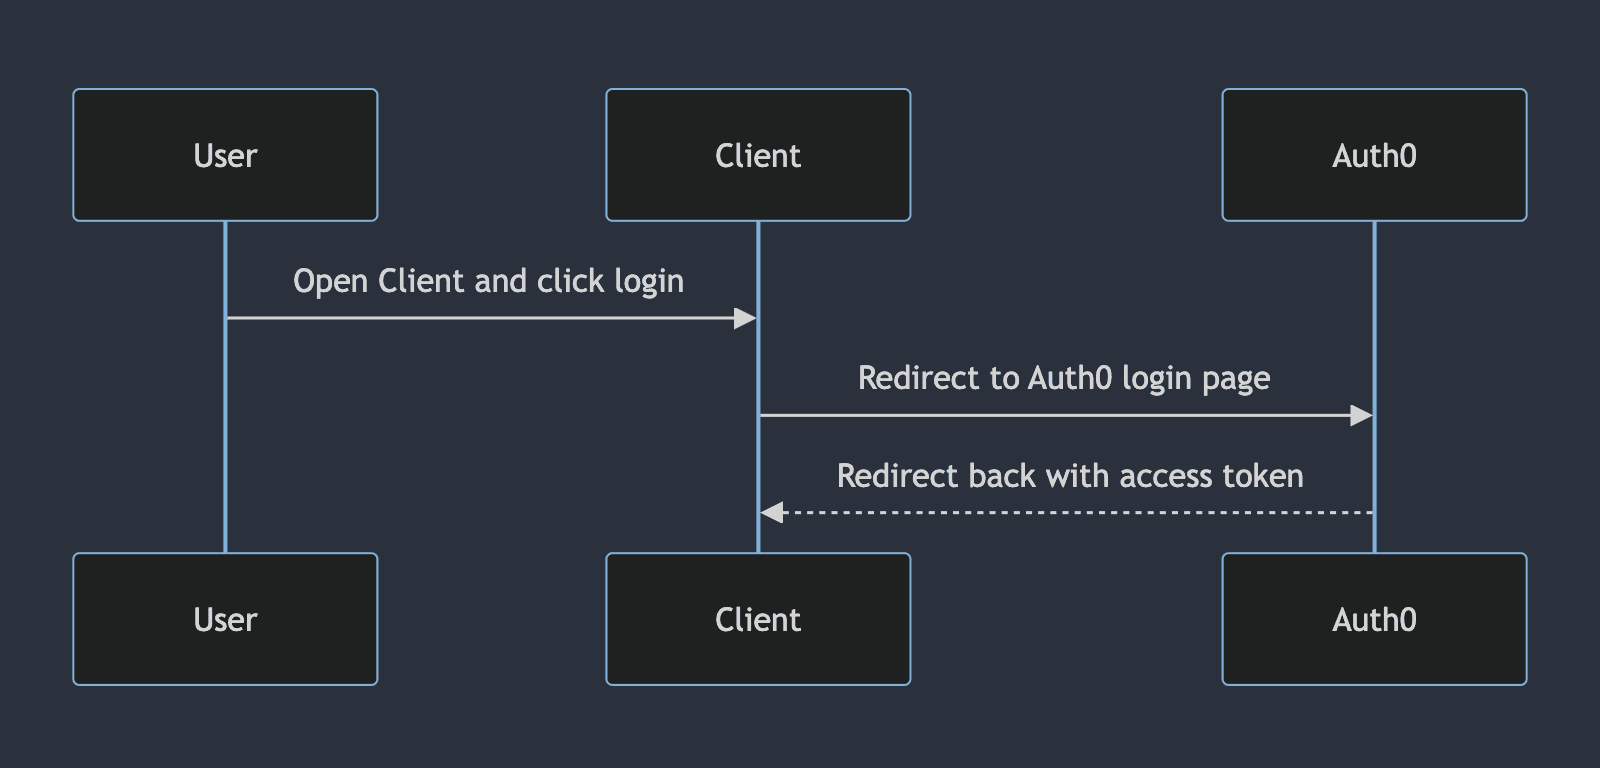
When the user opens the Client, they must log in. Instead of writing user authentication logic from scratch and handling passwords etc, we assume most developers will use a third-party authentication provider. We use Auth0’s implicit auth flow, which returns a time-limited access token to the Client. This access token will be used later by the user to make authenticated requests to the Backend. Once the user is logged in, they are shown the primary dashboard of the Client application.
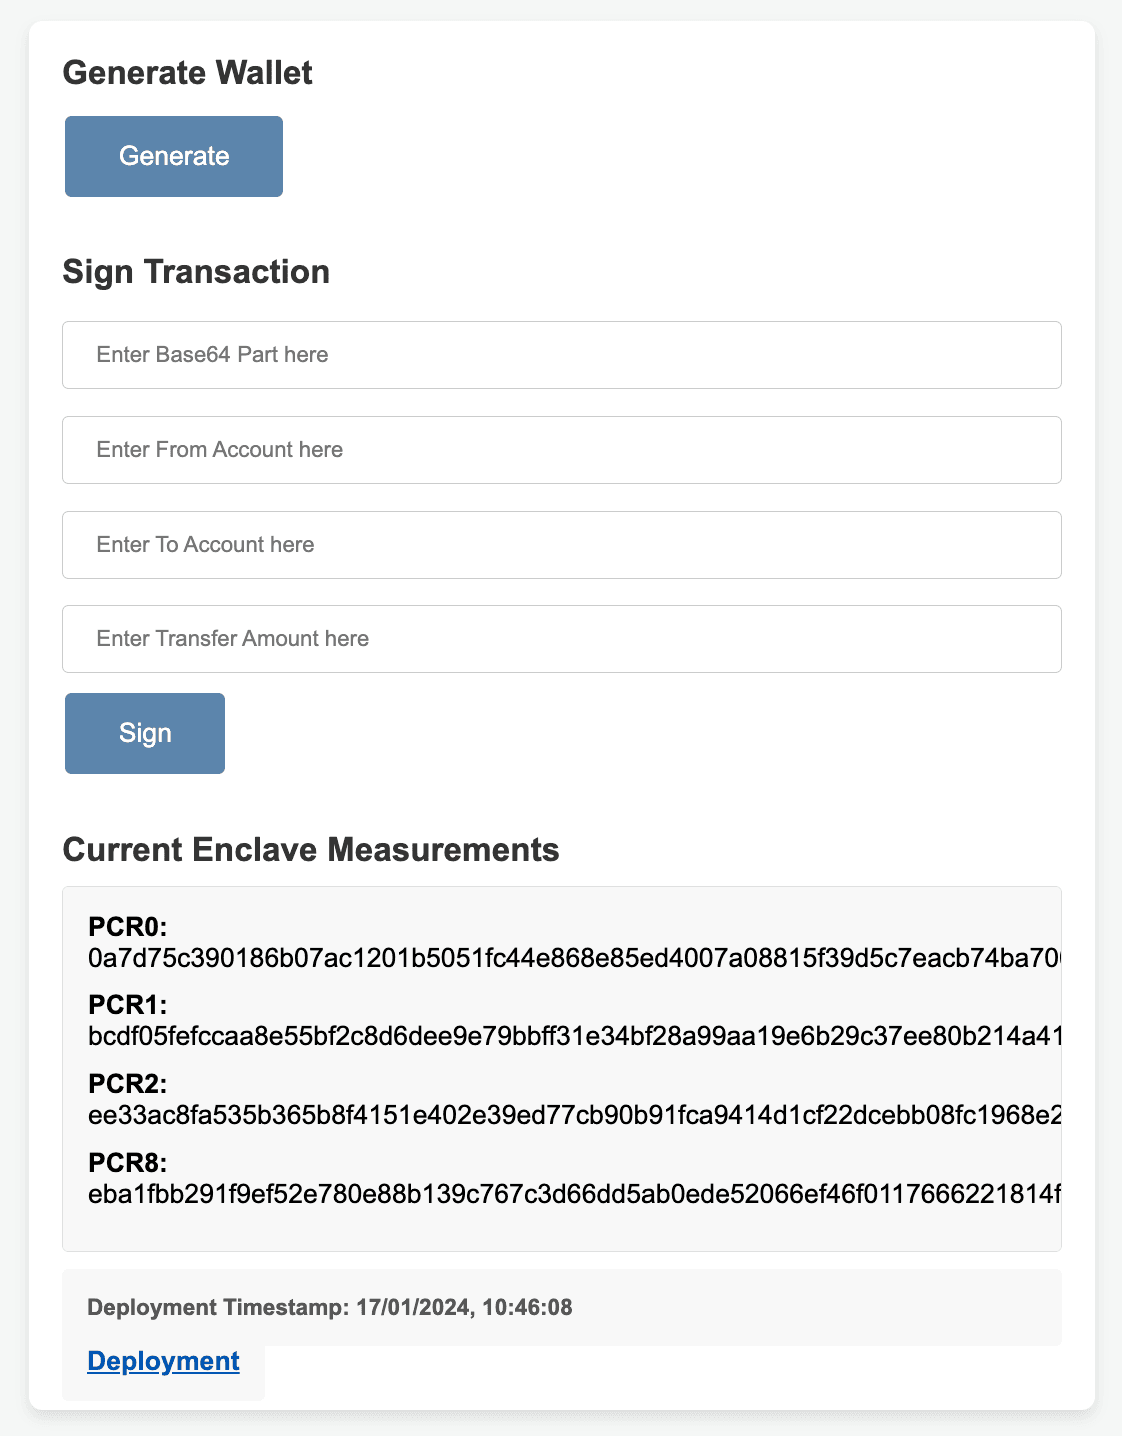
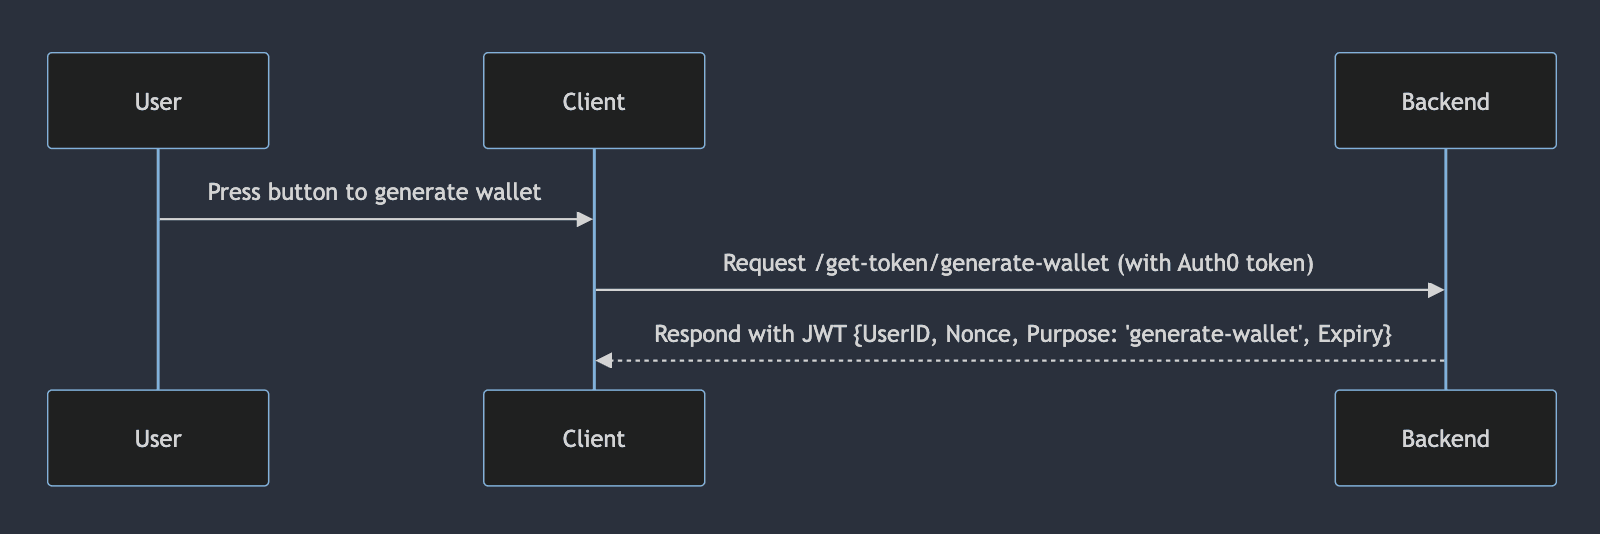
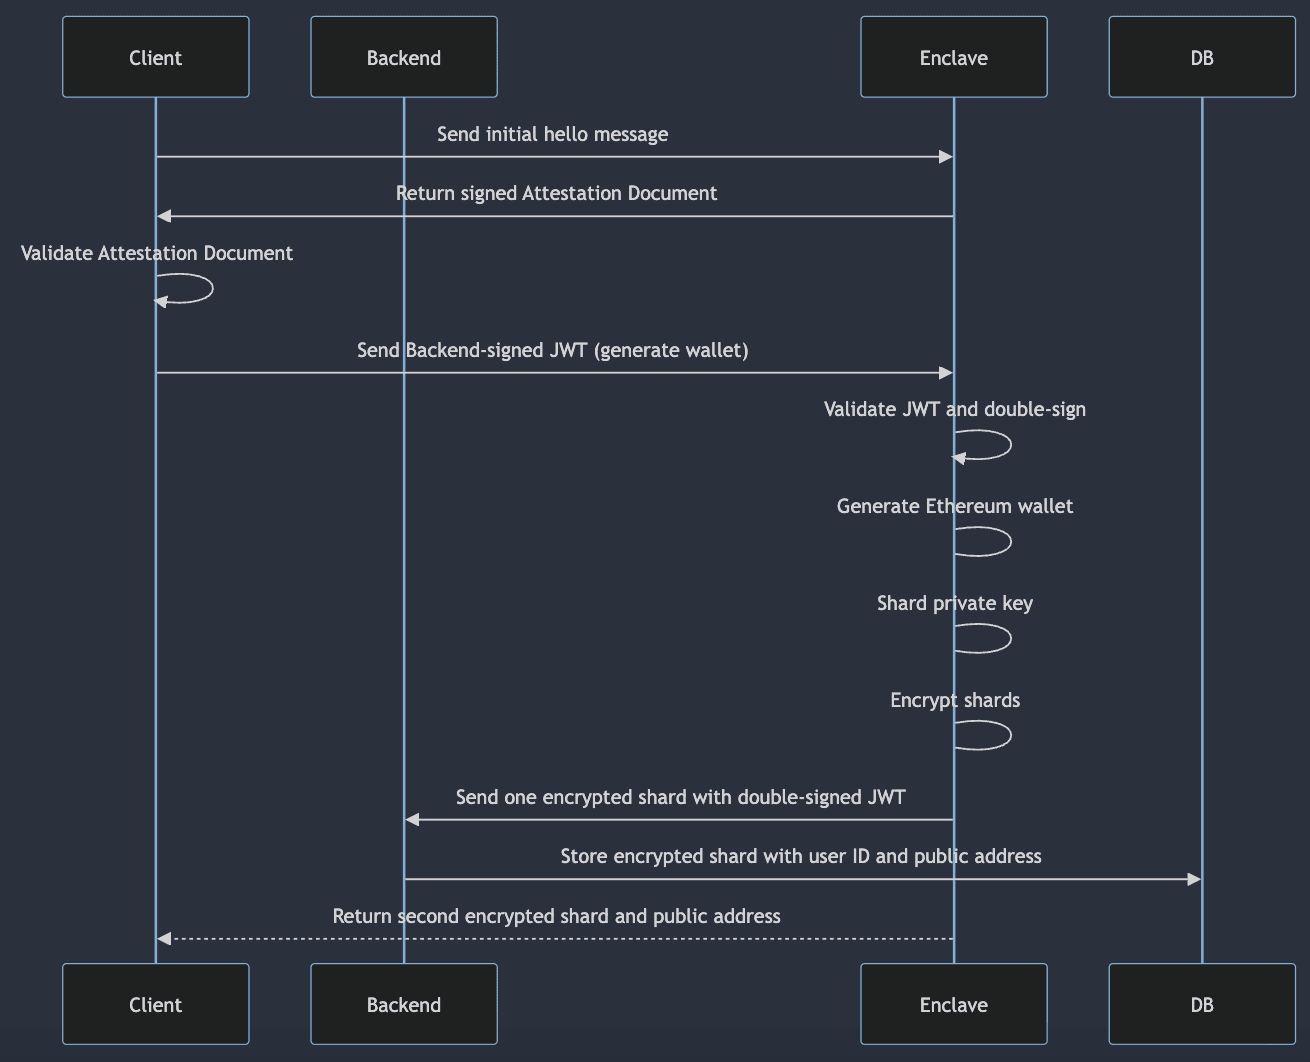
When the user decides to generate a wallet, an authenticated request is made to the Backend's /get-token/generate-wallet endpoint . The Backend generates a signed JSON Web Token (JWT) which includes the user's Auth0 ID, a nonce, the 'generate-wallet' purpose, and an expiry claim. The design of this token is to ensure that when users are making requests directly to the Enclave, they can only execute operations that were granted to them on a case-by-case basis by the Backend. In this example, the Backend only requires Auth0 authentication, but in production this could be made much stricter, requiring varying levels of verification for different Enclave processes.
Once the Client has received a JWT from the Backend, it makes an attested request to the Enclave’s /generate-wallet endpoint, using the JWT for authentication. The Enclave first validates that the JWT was signed by the Backend. If successful, it will generate an Ethereum wallet, which involves generating the sacred private key of the wallet. Shamir’s Secret Sharing is used to split the private key into two shares. The shares are then encrypted using the Encryption API available within Enclaves. One encrypted share is sent to the Backend and the other is returned to the user. The private key never leaves the Enclave. The Enclave authenticates its requests to the Backend by adding its own signature to the JWTs it receives (originally signed by the Backend).
Following the wallet generation process, the user and the Backend each have the Ethereum address of the new wallet and one of the encrypted shares of the private key. As the shares are encrypted, the user and Backend can store them wherever they want without having fear. Even if they were breached, the attacker would only have an encrypted mess.
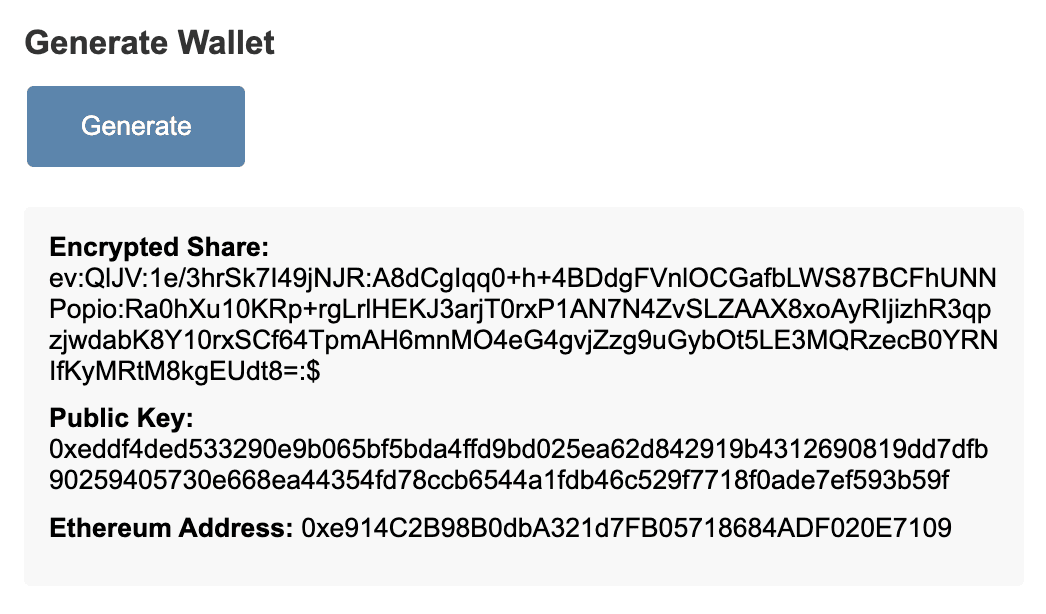
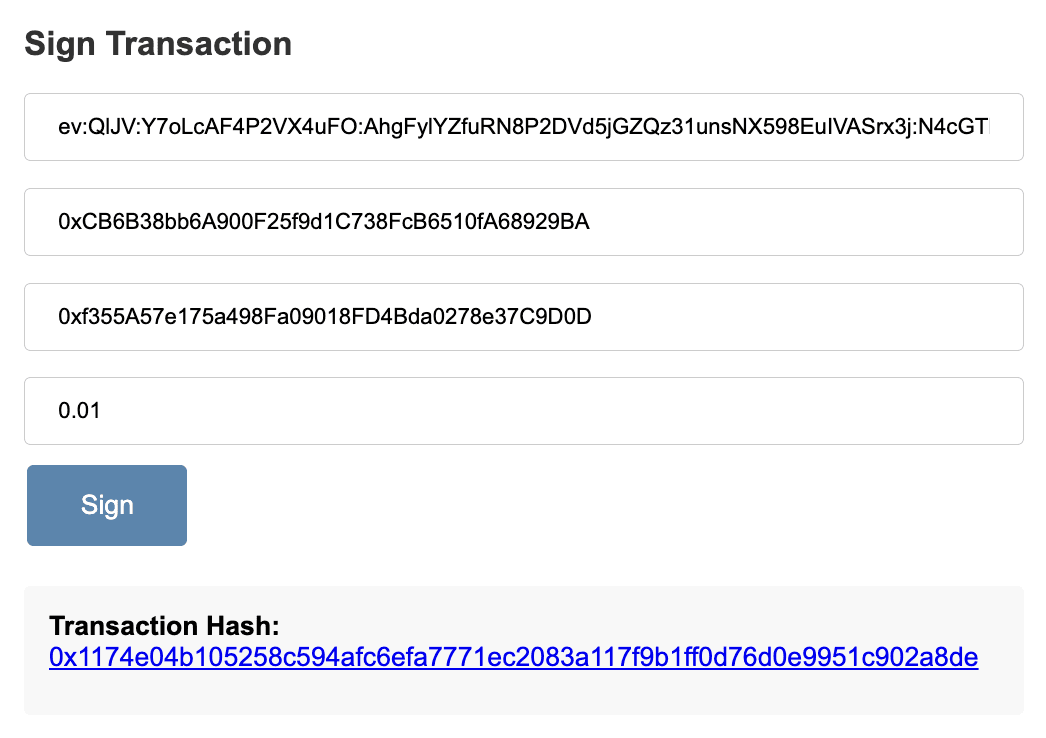
Now that the user has their fresh wallet, they should put some money in it! In this example we’ll put some fake Ethereum in it by using the Infura Testnet. Once they are fake Ethereum rich, the user naturally wishes to spend such fake Ethereum! They can fill out a transaction form in the dashboard by inputting their encrypted shard, the address of their wallet, the address of the recipient wallet and the transfer amount.
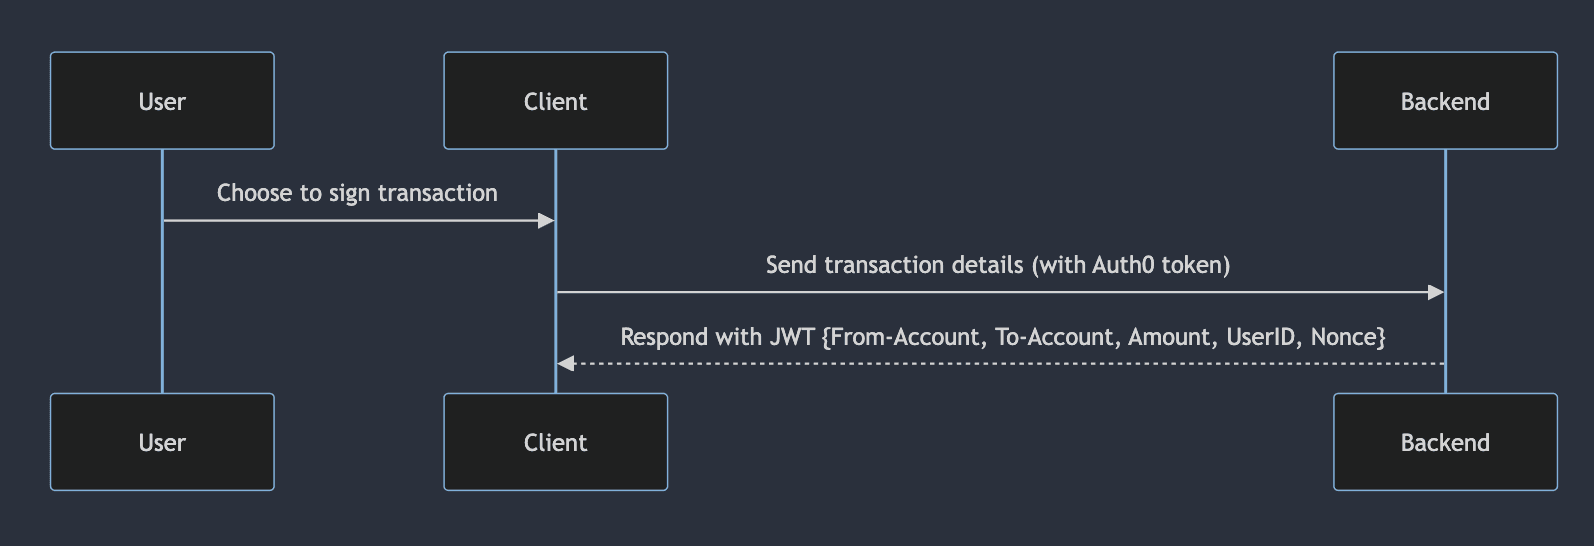
Similar to the previous process, the Client first gets a JWT from the Backend via the /get-token/transaction endpoint, which contains the transaction details.
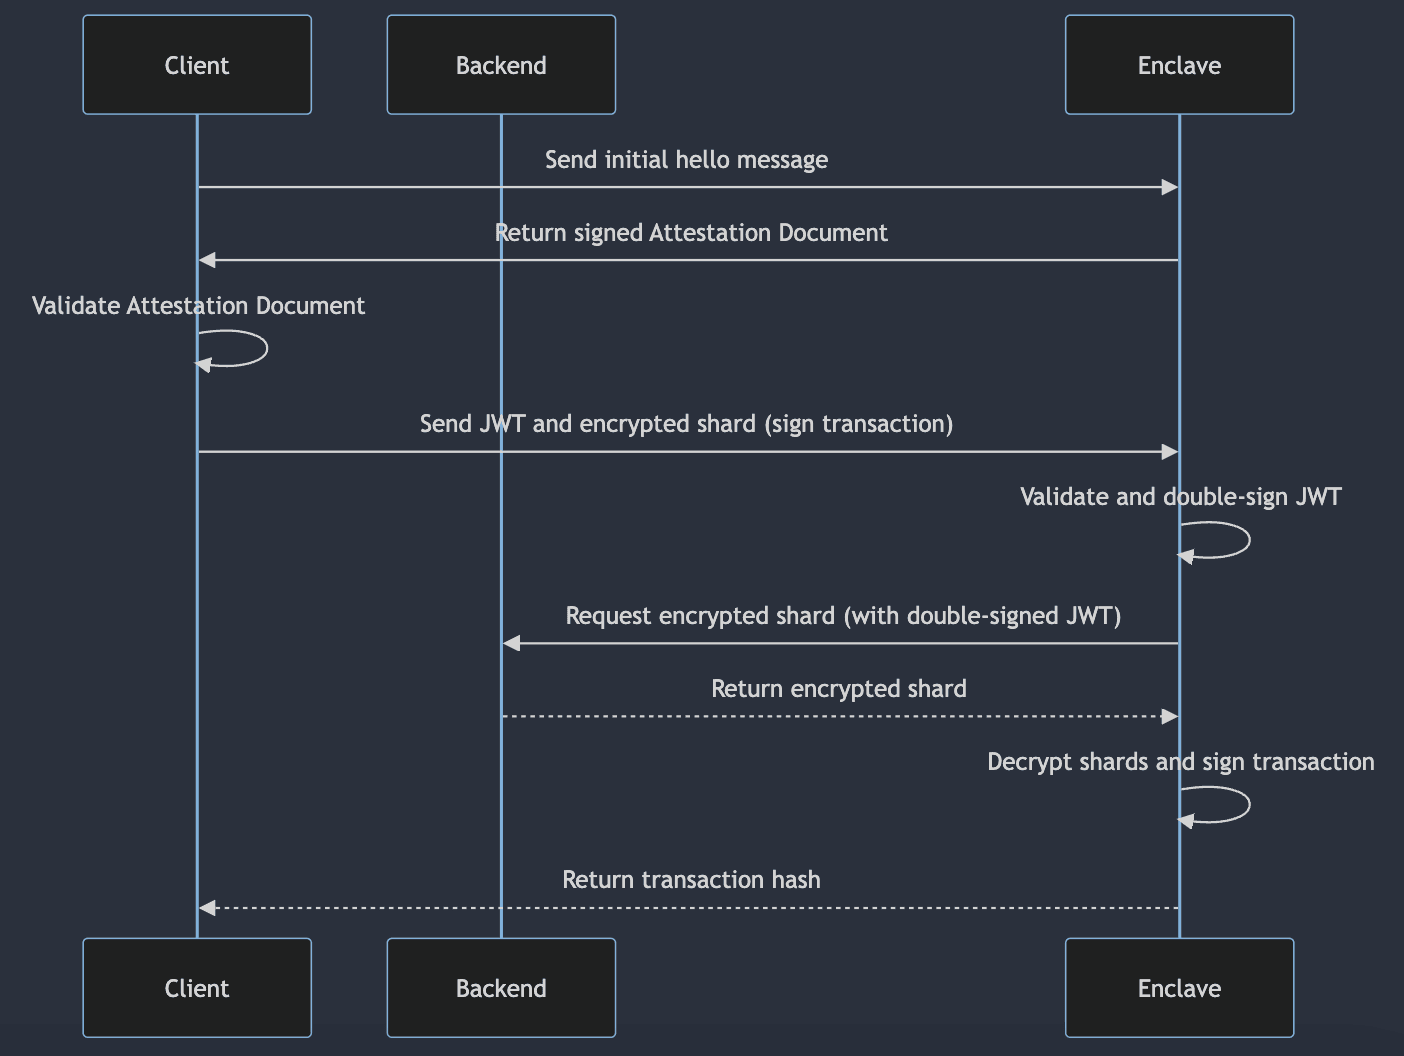
An attested request is made to the Enclave’s /sign-transaction endpoint, including the user’s encrypted shard. The user’s encrypted shard is automatically decrypted by the Enclave’s Data Plane. The Enclave retreives the other encrypted shard from the Backend, decrypts it, and combines the two shares to reproduce the private key. This private key is then used to sign the transaction. The transaction hash is returned to the user, which is displayed to in the Client along with a URL to the transaction details. The private key never leaves the Enclave!
We’ve been all about the user in this example, working to give them as much power over their data as possible. Let’s recap the power they’ve gained. The Provider also benefits from using Enclaves, so let’s discuss that as well!
The user no longer needs to worry about how to store their private key. They only need to take care of an encrypted shard, which they can store in multiple places without being at risk of leakage. If they are bold, they could even put it on the side of a bus. I wouldn’t recommend it though, as the downside of making yourself a target seems to outweigh the upside of the artistic expression.
The privacy-conscious user no longer needs to trawl through the Provider’s website to find their one-liner about how they process user data – which is usually just “encryption at rest” anyways. By using Enclaves’ Attestation feature, the user validates that the Provider can’t steal their key, nor could someone who hacks the Provider.
The flow of validating the Provider with Enclaves is much simpler and streamlined than other protocols such as Multi-Party Computation, which require deep cryptography knowledge to understand and validate.
If the Provider being breached resulted in the private keys of their users ending up on the Dark Web, they wouldn’t be Providing for much longer. In this case however, they would just find encrypted nonsense, which would only be worth the cyberpunk art they could make with it.
To add extra protection against rogue employees attempting to decrypt the data, a Data Policy is configured and used in each encryption request, which ensures that the encrypted data can only be decrypted in the Enclave. If an employee of the Provider tried to decrypt it using something like the Decrypt API, it would fail to decrypt!
Rather than pitching to your users that you’re handling their keys better than other providers, Enclaves lets the users validate it themselves! Instead of trying to explain complex in-house security methods to your customers, they can just read our lovely content about Enclaves and throw their money at you.
Not every use case will suit making part of your workflow open-source to your users. In some cases, it would just result in the user saying “Oh it’s open source? I’ll just run it myself then.” The reason it works so well for this secret sharing use case is that the users don’t want to run it themselves, because they don’t want to generate the private key on their machine.
This example could be adapted such that rather than the user attesting the Enclave, the Backend would attest the Enclave. This would take away much of the user benefits, as they can’t validate what’s happening with their data, but it still maintains the No Private Key Leaks benefit to the Provider. At least the Provider knows that they’re processing the data safely, which is a great first step. Most users would probably read that you’re using Enclaves and be happy enough.
The Enclaves docs have a Best Practices section with lots of info on how to ease the development process. I’ll give some advice here on what I personally found most useful. This section is for those intending to build something with Enclaves.
The Enclaves build and deploy command can be memory intensive, as it involves both Docker Image builds and Nitro Enclave image builds. If your image is large, it will also be network intensive, as the full image must be uploaded to Evervault’s infrastructure. I prefer to use GitHub Actions for deployment from the beginning, so I don’t need to use up my own resources during deployments. It also feels much more out-of-sight out-of-mind. I’ll just push a commit to GitHub and not think much about the deployment. If the deployment is running on my machine, I tend to keep checking on it.
The deployments took about 8 minutes each for my Enclave, so the feedback loop for errors can be quite long. My strategy was to run the server.py locally to test small changes. If there was a significant change, especially one involving environment variables, I would run the Docker Image locally, to increase the similarity to how the Enclave would be running. Local testing becomes trickier once you start using the Encryption API, because you need to create your own Mock Encryption API. This mock was simple enough to generate using a GPT though, as it’s just an echo server that encrypts every field in a JSON.
In this post we provided an end-to-end technical example of how to use Enclaves in a realistic product. All of the source code is public, so you can use parts of it as a reference when you are making your own application.
The concept of Attestation and the new trust model it creates is a paradigm shift for many developers. I encourage you to take a few moments to think about areas of your own product that could benefit from Enclaves. Is there a part of your architecture that your users would like to have more assurance about? If so, get started!
We’ll close with a video of the full demo:
Deploy and attest your first Secure Enclave using three commands from the Evervault CLI.
Learn more