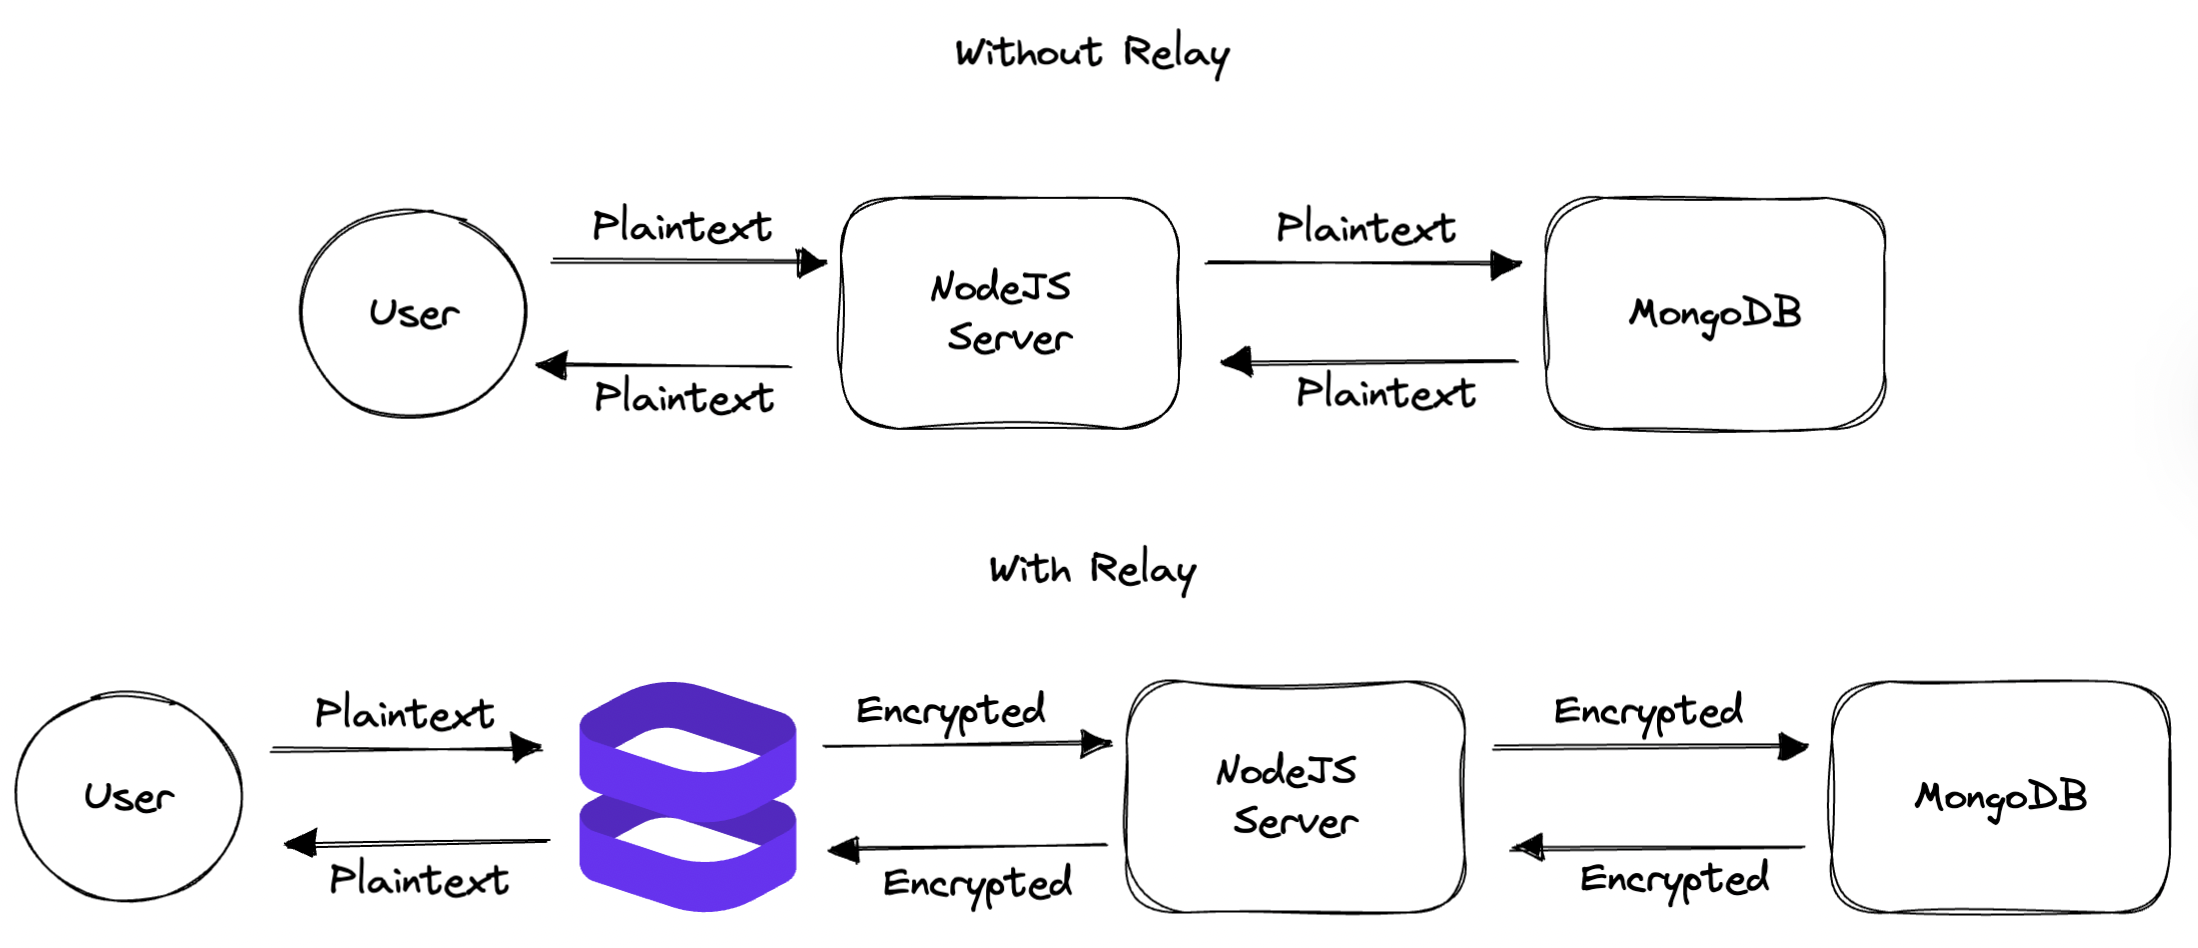
In this blog post, I demonstrate how you can use our invisible encryption proxy, Inbound Relay, to automatically intercept and encrypt any sensitive fields that would otherwise sit unencrypted on your infrastructure. Inbound Relay does the following:
- Takes requests from your client
- Routes them through the proxy (which encrypts your request at field-level encryption)
- Forwards them to your infrastructure
To build a simple CRUD application with encrypted fields, we’ll use Node.js with an HTML data collection form that will write to a MongoDB Atlas Database. From there, we’ll use Inbound Relay to intercept the request, encrypt some fields, and then pass the encrypted fields through to your server. Your server will then store the encrypted values in MongoDB.
We’ve based most of the code for this demo on the existing Evervault tutorial, where we collect details, encrypt them using Inbound Relay, and use a Function to send a text using Twilio.
First, we’ll cover:
- Setting up the server
- Creating a form to collect data
- Setting up the database
- Encrypting Data at the field level before it hits your infrastructure
- Reading Encrypted Data
Once we have this setup, we’ll add functionality to read data from the database and display it back to the user.
Building an App with Field Level Encryption
1. Setting up the server
We’ll build on our local machines, so the first step is to set up a root folder for the project.
Open up the terminal and:
Create a new directory for the mkdir walkthrough_demo and move it into the directory cd walkthrough_demo.
1mkdir walkthrough_demo && cd walkthrough_demo
Create a package.json file using npm init. This file provides npm with the details needed to identify the project and handle dependencies. You’ll be asked to input details when setting it up, as I’m running this on my local machine, after hitting enter for each request, I ended up with:
1{
2  "name": "walkthrough",
3  "version": "1.0.0",
4  "description": "",
5  "main": "index.js",
6  "scripts": {
7    "test": "echo \"Error: no test specified\" && exit 1"
8  },
9  "author": "",
10  "license": "ISC"
11}
12
13
14Is this OK? (yes)
Before we move into src, we want to make sure we have express installed. We can quickly do this by running:
Once package.json has been generated, we’ll make a new directory src using mkdir src.
Once express has been installed, we create our index.js file within the src directory.
We can do this by creating theindex.js file within the src directory and copying this to the file:
1// Include Express.js, a library for easily building APIs in Node.js
2const express = require('express');
3
4// Create an Express.js application
5const app = express();
6
7// Serve static files from the public folder (that we'll create later)
8app.use(express.static('public'));
9
10// Return middleware that only parses POST JSON requests and only looks at requests where the Content-Type header matches the type option
11
12app.use(express.json());
13
14// Start this app as an Express.js server on port 3030
15app.listen(3030, () => {
16  console.log('Server listening on port 3030');
17});
Once we have index.js set up, we can validate that everything is running by moving back to the root directory, walkthrough_demo and running node src.
This message should appear in your terminal:
1mikie@Mikies-MacBook-Pro walkthrough_demo % node src
2Server listening on port 3030
2. Creating a form to collect data
Now that our server is listening, we create a webpage with a form that accepts input and sends it to our server.
We begin by creating a public folder in our root directory and move into it using:
1mkdir public && cd public
Within the folder, we create a simple HTML file called index.html which collects the details being submitted.
We're going to split the HTML into two portions.
- The form that will submit the data
- The script that will run when the form is submitted
You can add the form that will submit the data by copying the following details into the index.html file:
1<!DOCTYPE html>
2<html>
3<!--This is the header of the document that will have the page heading-->
4<head>
5  <link rel="stylesheet" type="text/css" href="style.css">
6  <section>
7    <div>
8      <h1>Encryption Infrastructure</h1>
9      <h3 >Collect, process, and share sensitive data securely. </h3>
10    </div>
11  </section>
12</head>
13<title>Relay Demo</title>
14<body>
15  <section id="sec1">
16     <!-- This is the form with fields  and a button for submitting the form. -->
17    <div>
18      <img>
19      <form id="form">
20        <p><input id="fname" type="text" placeholder="First Name" required /></p>
21        <p><input id="sname" type="text" placeholder="Surname" required  /></p>
22        <p><input id="phone" type="text" placeholder="Phone number" required/></p>
23        <p><input id="email" type="text" placeholder="Email Address" required/></p>
24        <p><input id="addl1" type="text" placeholder="Address Line1" required /></p>
25        <p><input id="addl2" type="text" placeholder="Address Line2" required /></p>
26        <p><input id="city" type="text" placeholder="City" required /></p>
27        <p><input id="country" type="text" placeholder="Country" required /></p>
28        <p><button class="submit" style="position:relative; right:-22.5px">Submit Details</button></p>
29      </form>
30    </div>
31</section>
32</body>
Below that, in the same file, add the following script so that the data can be submitted:
1<script>
2// When the form is submitted, run this code
3// to handle sending the data as JSON to the API
4document
5  .getElementById('form')
6  .addEventListener('submit', async (event) => {
7// Override the default browser settings for handling forms
8    event.preventDefault();
9// Send a POST request to https://{this URL}/user with the name and phone number encoded in JSON
10    const res = await fetch('/user', {
11      method: 'POST',
12      headers: {
13        'Content-Type': 'application/json',
14      },
15      body: JSON.stringify({
16        fname: document.getElementById('fname').value,
17        sname: document.getElementById('sname').value,
18        email: document.getElementById('email').value,
19        phone: document.getElementById('phone').value,
20        addl1: document.getElementById('addl1').value,
21        addl2: document.getElementById('addl2').value,
22        city: document.getElementById('city').value,
23        country: document.getElementById('country').value,
24      }),
25    });
26// Take the response from the API and parse it as JSON
27    const data = await res.json();
28  });
29</script>
30</html>
Now that the form is built, we need to update our index.js so our server can receive the request.
This can be done by adding the following code after the app.use(express.json()); line in your code:
1// Define a route and a handler function for that route
2app.post('/user', async (req, res) => {
3  const { fname, sname, phone, email, addl1, addl2, city, country } = req.body;
4
5//printing the details that were received to the console
6console.log('Received details', { fname, sname, email, phone, addl1, addl2, city, country })
7})
Once you've added and saved this, put your details into the form on your local host at http://localhost:3030/
Your output in the terminal should look similar to mine:
1Received details {
2  fname: 'Claude',
3  sname: 'Shannon',
4  email: 'claude.shannon@evervault.com',
5  phone: '0861234567',
6  addl1: 'Exchequer Chambers',
7  addl2: '27 Exchequer Street',
8  city: 'Dublin',
9  country: 'Ireland'
10}
3. Setting up your database
Now that the basic application and server are working, we can set up the database we’ll write the form data to.
For this example, we’ll use MongDB Atlas.
First, we install MongoDB dependencies using npm install mongodb.
Update the top of your index.js with:
1// Adding reqs for mongo
2const MongoClient = require('mongodb').MongoClient
We now set up a MongoDB account - this can be done by following this link and creating the account.
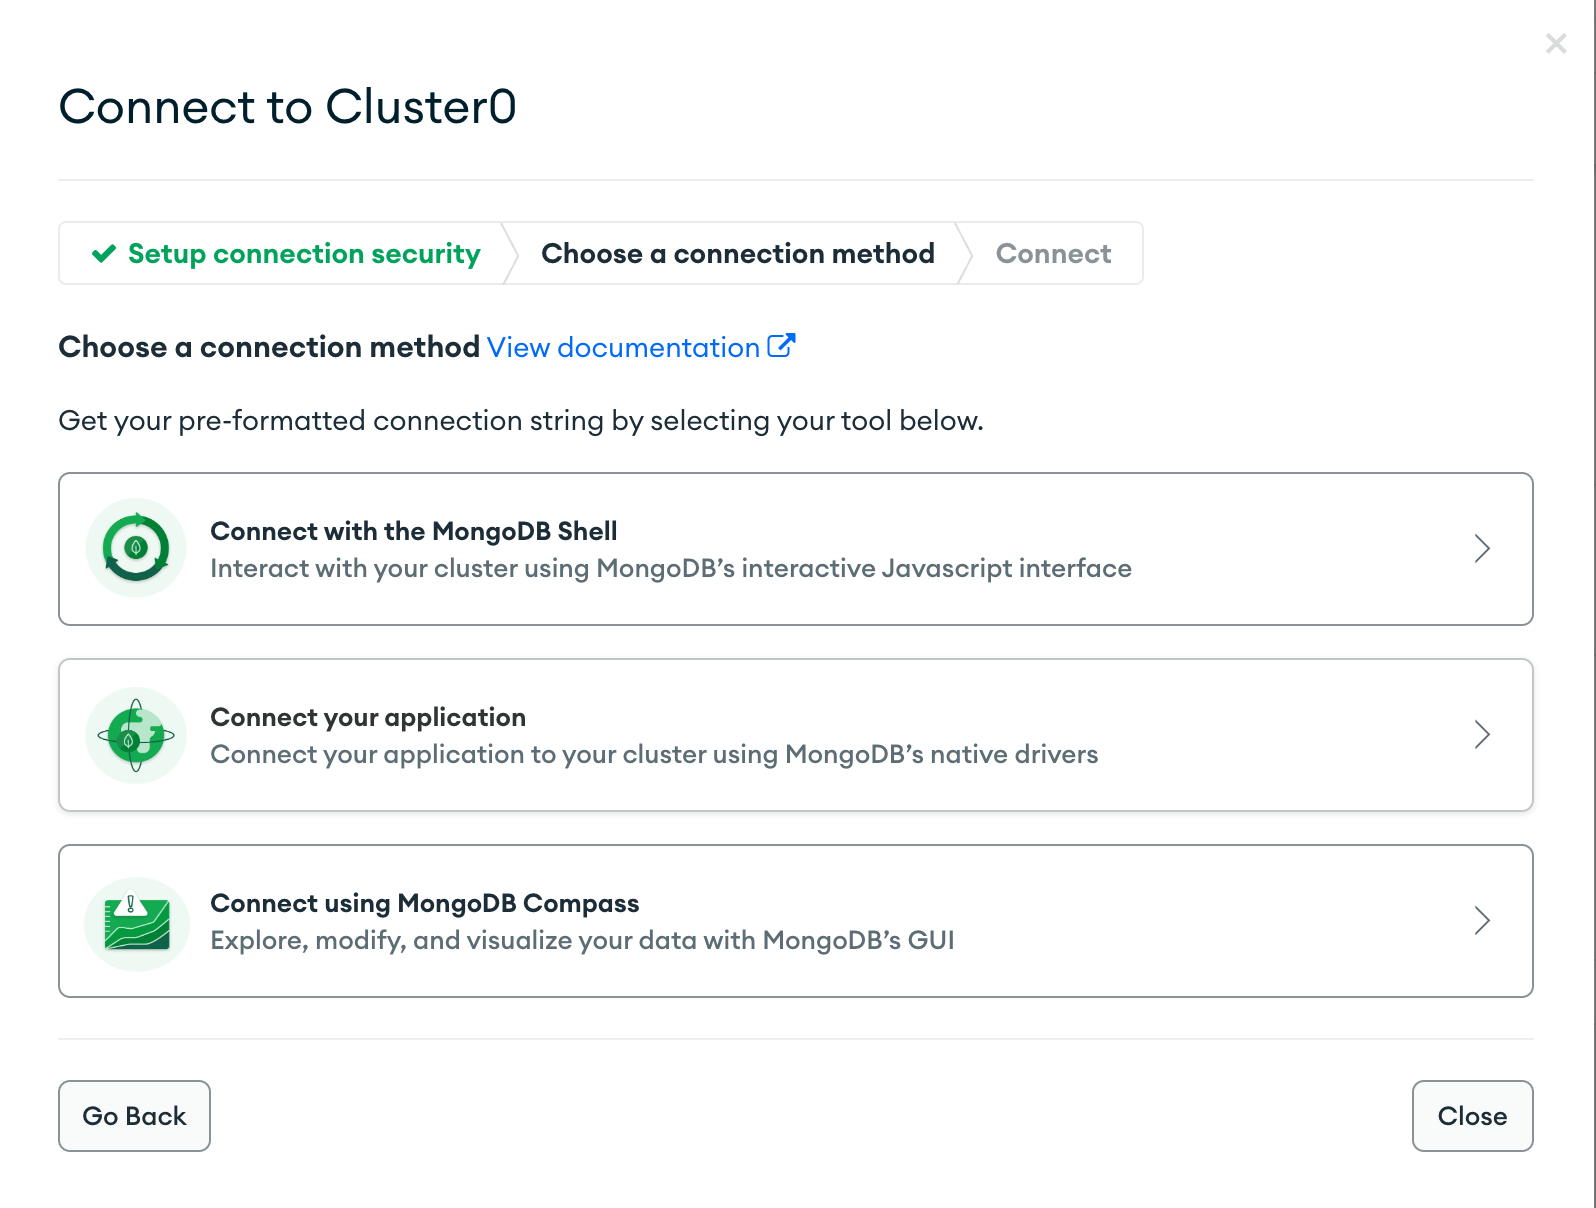
Once we have an account, we create a Database. We’ll use a Shared Cluster.
- Choose your preferred cloud provider, select the region you want to host your database in, and hit Create Cluster.
- Then, create a Username & Password to authenticate the connection.
- These credentials are different from your MongoDB login credentials, they are specifically for this database.
- Once you have this created, select ‘Connect your application’:
Once connected, you should have a connection string like this one:
1mongodb+srv://<databaseusername>:<password>@cluster0.qv0zk8j.mongodb.net/?retryWrites=true&w=majority
We're going to take this string and create a .env file using vim .env and add the following to the file
1MONGO_DB_URL=mongodb+srv://<databaseusername>:<password>@cluster0.qv0zk8j.mongodb.net/?retryWrites=true&w=majority
Once this is done, update the top of your index.js with:
1const mySecret = process.env['MONGO_DB_URL']
We now take the input from the form and write it
the response to our database.
1MongoClient.connect(mySecret, { useUnifiedTopology: true })
2  .then(client => {
3  console.log('Database Connected')
4
5//setting the constants for the db
6//This is naming the database within Mongo
7  const db = client.db('demo2')
8//This is naming the collection within the database that will store what is being written
9  const mongocolletion = db.collection('form2')
10
11//Taking the data from the intake HTML Form
12  app.post('/user', async (req, res) => {
13    const { fname, sname, phone, email, addl1, addl2, city, country } = req.body;
14//writing the data to the DB
15    try {
16     const result = await mongocolletion.insertOne(req.body);
17     console.log(result);
18     console.log('Received details', { fname, sname, email, phone, addl1, addl2, city, country })
19    } catch(err) {
20     console.error(err);
21    }
22  })
23})
The entire code for index.js should now look like:
1// Include Express.js, a library for easily building APIs in Node.js
2const express = require('express');
3
4// Create an Express.js application
5const app = express();
6//Include the variable for mongodb
7const mySecret = process.env['MONGO_DB_URL']
8
9// Serve static files from the public folder (that we'll create later)
10app.use(express.static('public'));
11
12// Return middleware that only parses POST JSON requests and only looks at requests where the Content-Type header matches the type option
13app.use(express.json());
14
15//Adding reqs for mongo
16const MongoClient = require('mongodb').MongoClient
17
18//Connecting to the Mongo Db
19MongoClient.connect(mySecret, { useUnifiedTopology: true })
20  .then(client => {
21  console.log('Database Connected')
22
23//setting the constants for the db
24//This is naming the database within Mongo
25  const db = client.db('demo2')
26//This is naming the collection within the database that will store what is being written
27  const mongocolletion = db.collection('form2')
28
29//Taking the data from the intake HTML Form
30  app.post('/user', async (req, res) => {
31    const { fname, sname, phone, email, addl1, addl2, city, country } = req.body;
32//writing the data to the DB
33    try {
34     const result = await mongocolletion.insertOne(req.body);
35     console.log(result);
36     console.log('Received details', { fname, sname, email, phone, addl1, addl2, city, country })
37    } catch(err) {
38     console.error(err);
39    }
40  })
41})
42
43// Start this app as an Express.js server on port 3030
44app.listen(3030, () => {
45  console.log('Server listening on port 3030');
46});
If you submit details from your browser, you should see something like this come through on your server:
1mikie@Mikies-MacBook-Pro walkthrough_demo % node src
2Server listening on port 3030
3Connected to Database
4{
5  acknowledged: true,
6  insertedId: new ObjectId("632c36b0d7095e6235ad2dad")
7}
8Received details {
9  fname: 'Claude',
10  sname: 'Shannon',
11  email: 'claude.shannon@evervault.com',
12  phone: '0861234567',
13  addl1: 'Exchequer Chambers',
14  addl2: '27 Exchequer Street',
15  city: 'Dublin',
16  country: 'Ireland'
17}
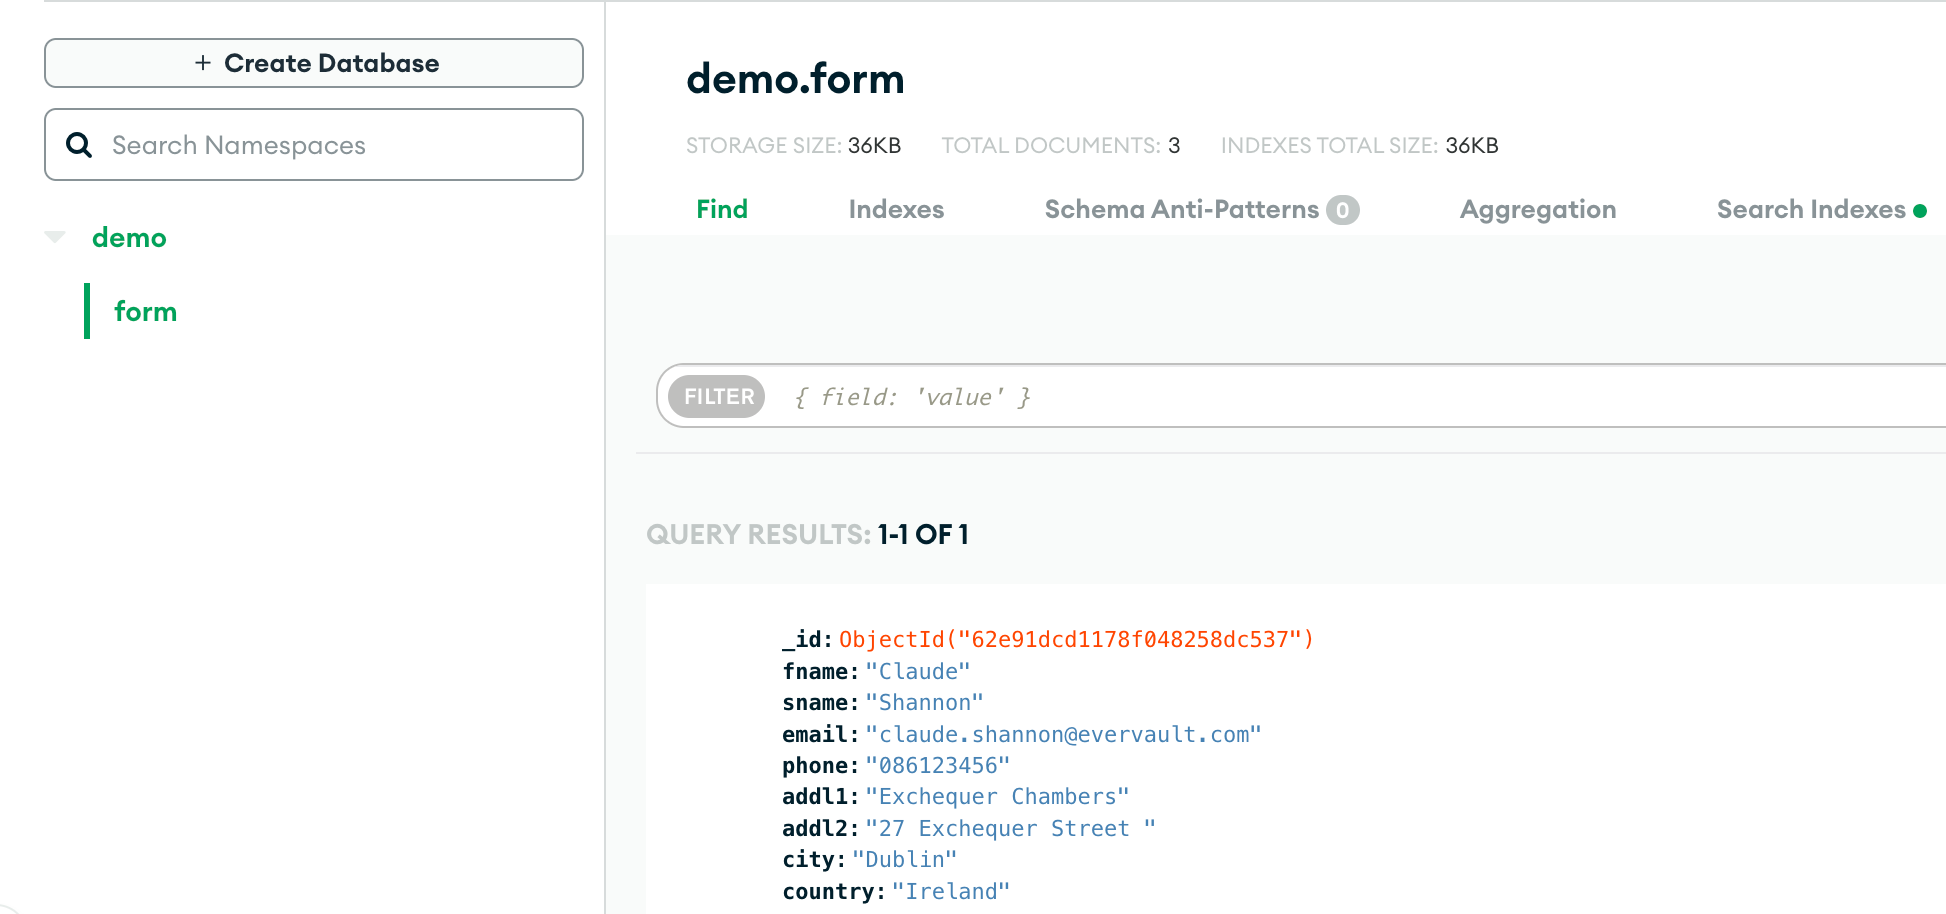
Switch over to your MongoDB and select ‘Browse Collections’ from the Database Deployments view.
- You should see that demo.form has been created as a collection, and the response that came through your node server has been written to MongoDB.
Congratulations! You just build a basic CRUD application that can take input from a HTML form and write it to a MongoDB
4. Encrypting data before it hits your infrastructure
Now that we have an app that takes input and writes the response to a database let’s increase our security posture. At the minute, if a malicious engineer or hacker managed to access our application or database - they could see all of the plaintext data we have collected.
First, sign up for a free Evervault account here.
Once you’ve entered your details and created an account, you’re ready to create your first Inbound Relay from the Dashboard!
Once you have your Evervault account created, take the API key from the Settings page in the Evervault dashboard and put it in a .env file.
- To do so, we’ll use
dotenv.
- From the project directory run:
Update your .env file using vim .env and add the following to the file
1EVERVAULT_API_KEY=<YOUR_API_KEY>
Once the .env file has been created, copy the following into the start of your index.js file
1require('dotenv').config()
For this walkthrough, as we’re running this locally, we use Ngrok to expose our local server ports to Evervault.
- You can download Ngrok here - if you have a domain you are already hosting your app on you can use that instead.
- Once you have Ngrok installed, we’ll use it to provision a domain that we can use to create our Inbound Relay.
- In a new terminal, run
ngrok http https://localhost. Doing this will give you a forwarding address like:
1ngrok by @inconshreveable                                                                          (Ctrl+C to quit)
2
3Session Status                online
4Account                       Mikie Lennon (Plan: Free)
5Version                       2.3.40
6Region                        United States (us)
7Web Interface                 http://127.0.0.1:4040
8Forwarding                    http://5829-109-255-32-5.ngrok.io -> https://localhost:443
9Forwarding                    https://5829-109-255-32-5.ngrok.io -> https://localhost:443
10
11Connections                   ttl     opn     rt1     rt5     p50     p90
12                              0       0       0.00    0.00    0.00    0.00
Now that you have your account created and our local tunnels are set up, we’ll create an App for our Inbound Relay.
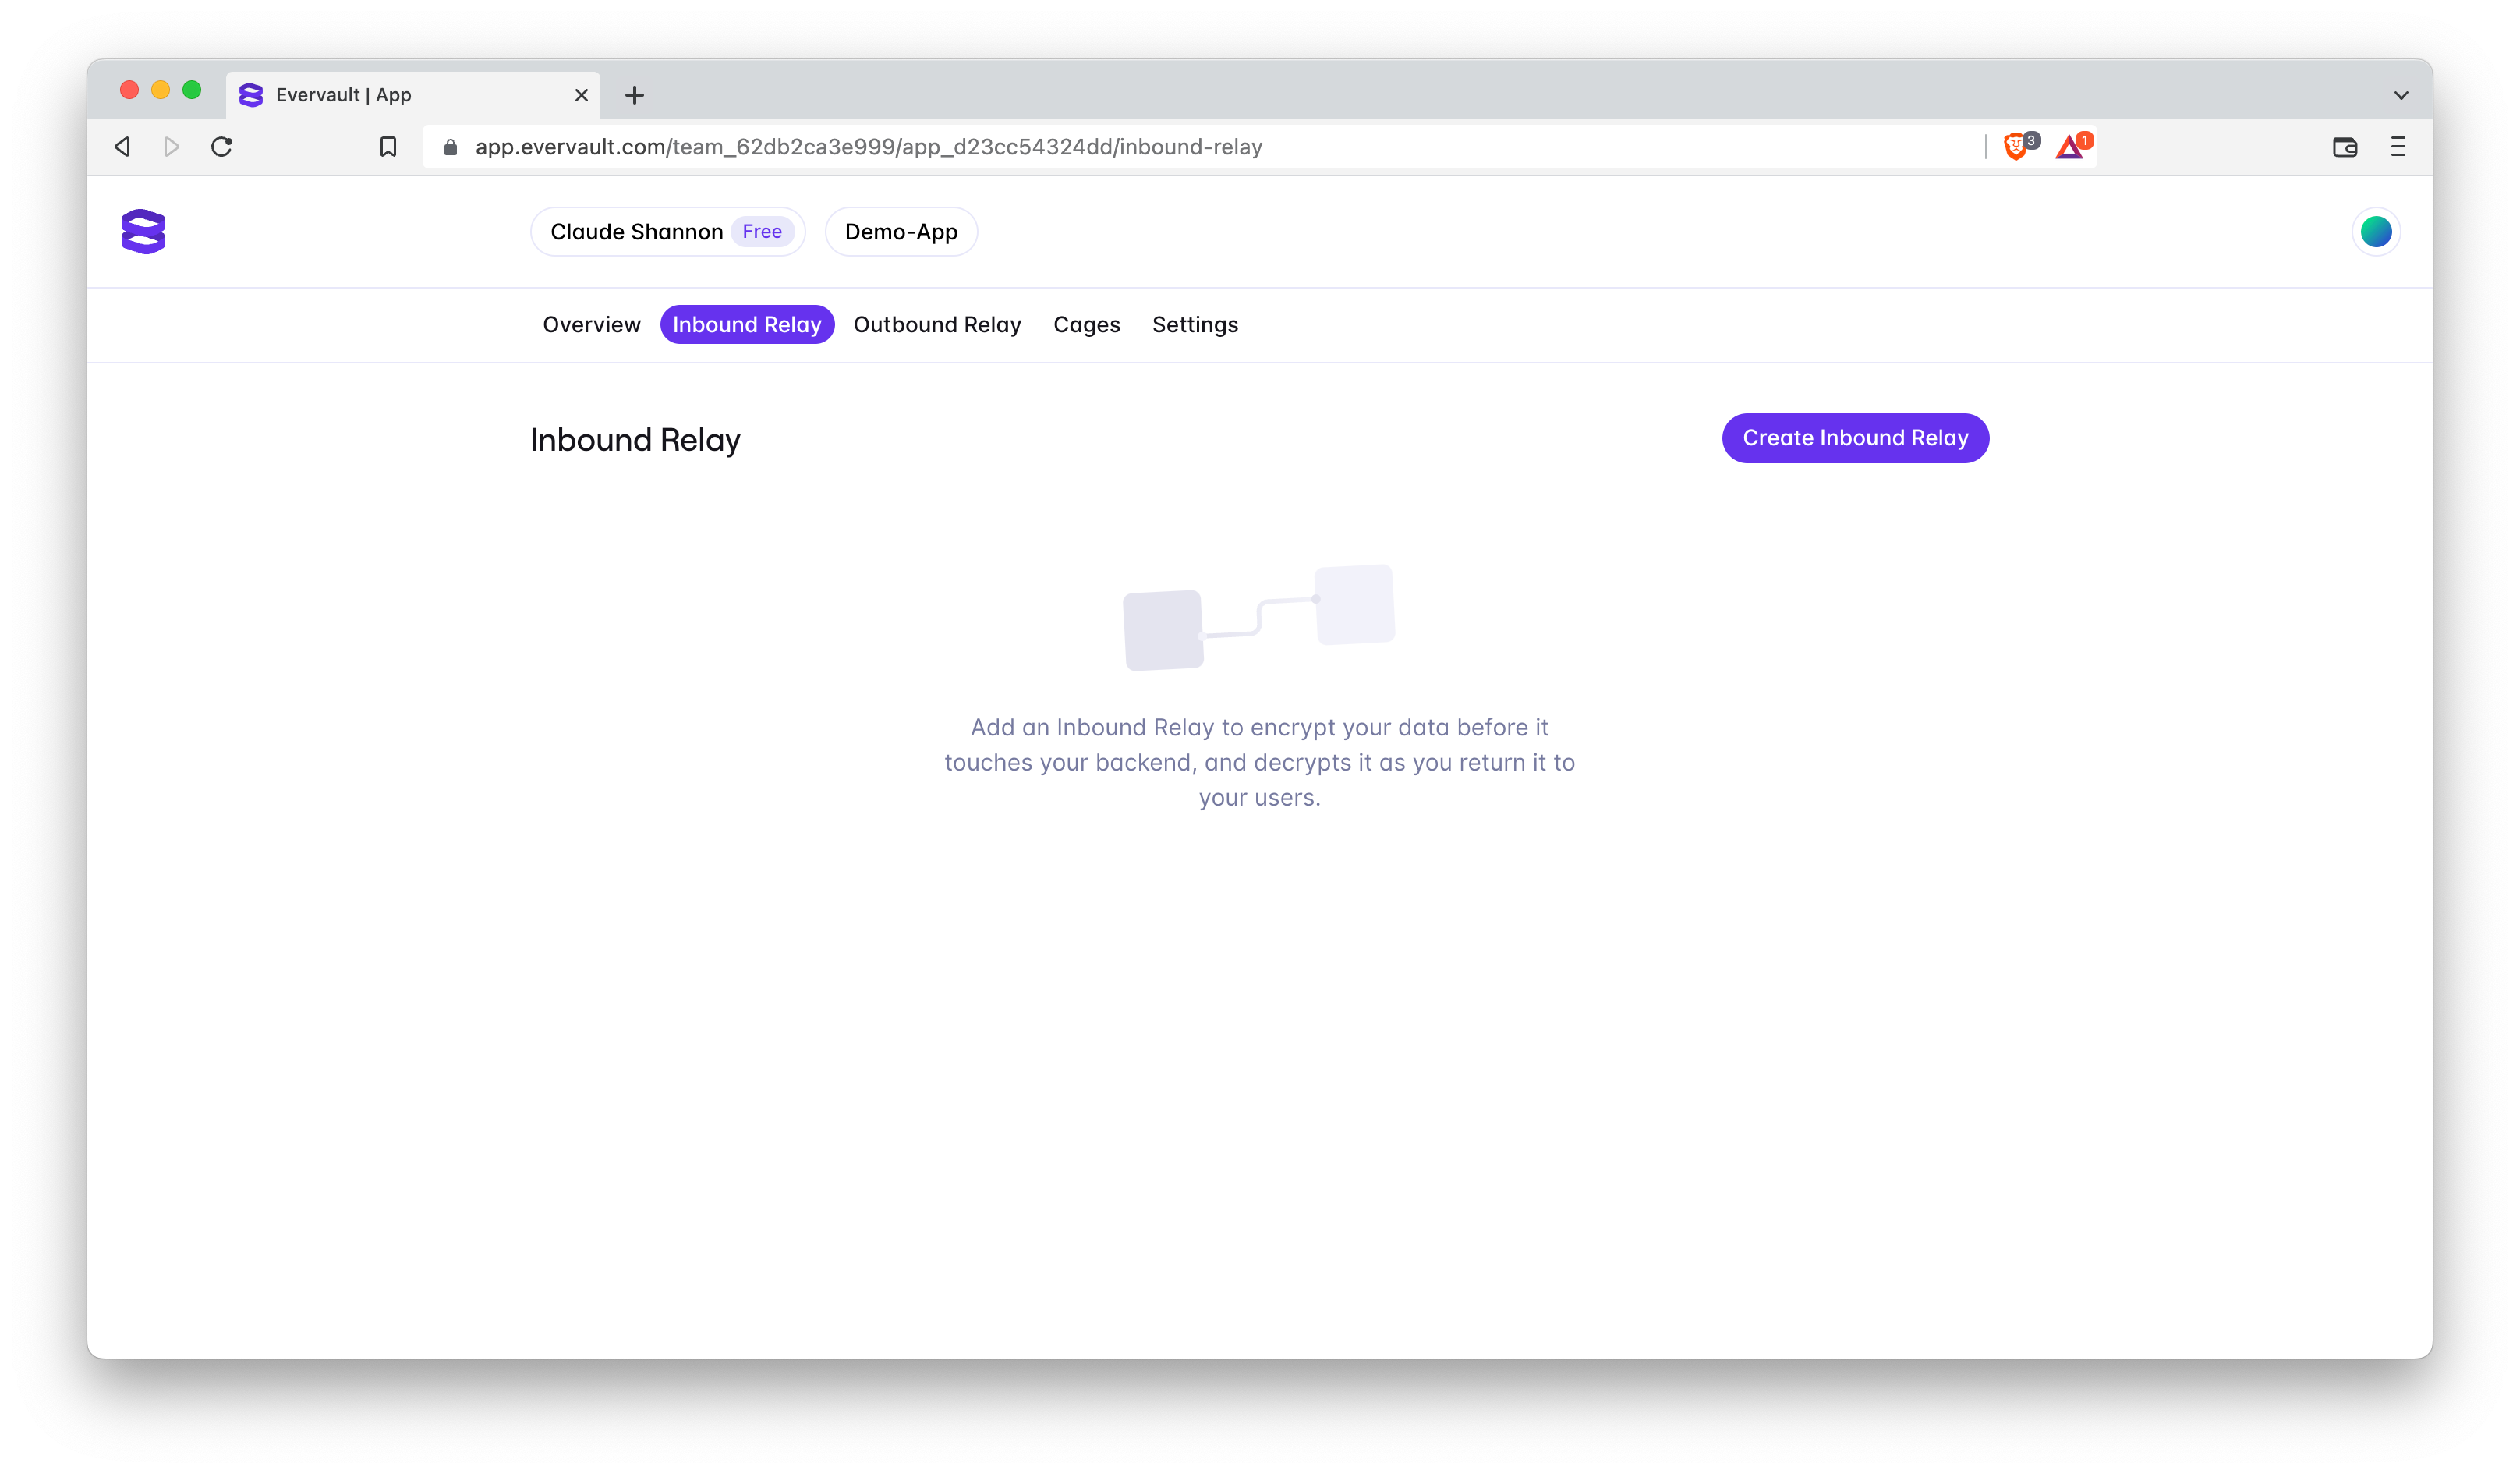
Once the App has been created, go to the 'Inbound Relay' tab and you will see the 'Create Inbound Relay' button.
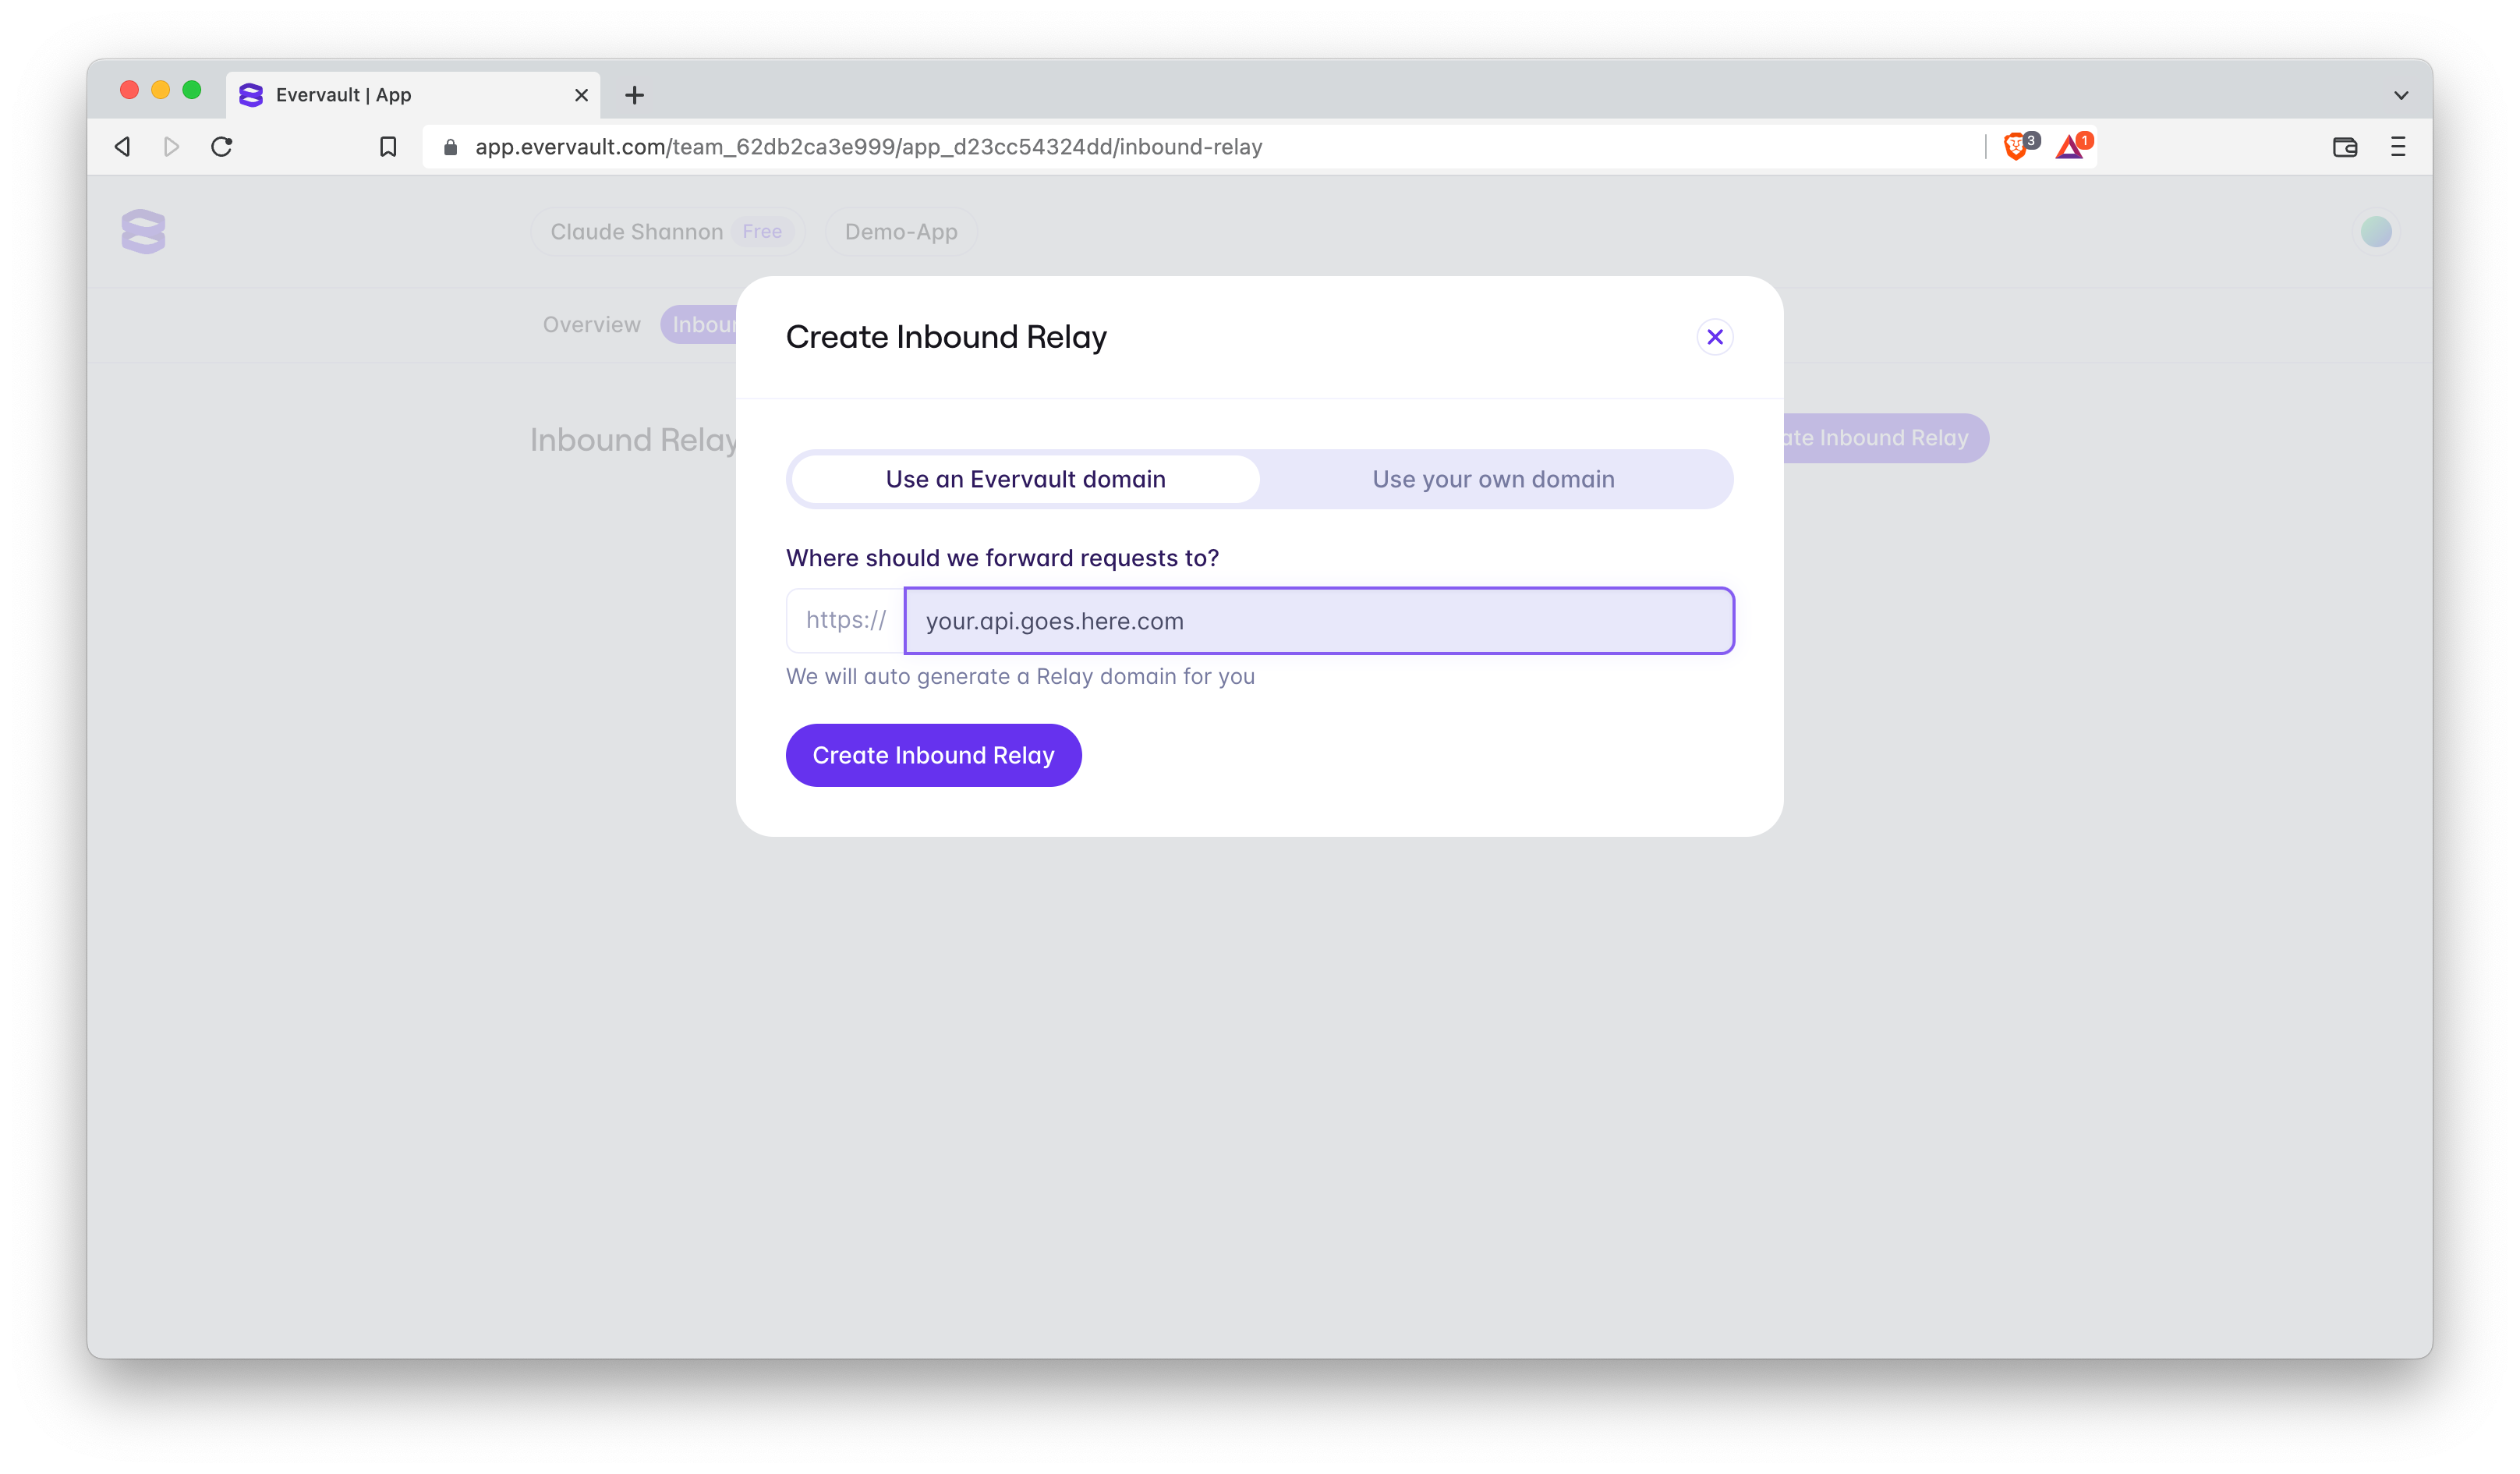
Using the app.evervault.com dashboard, select ‘Create Inbound Relay’ and enter the domain that we’ll be forwarding requests to:
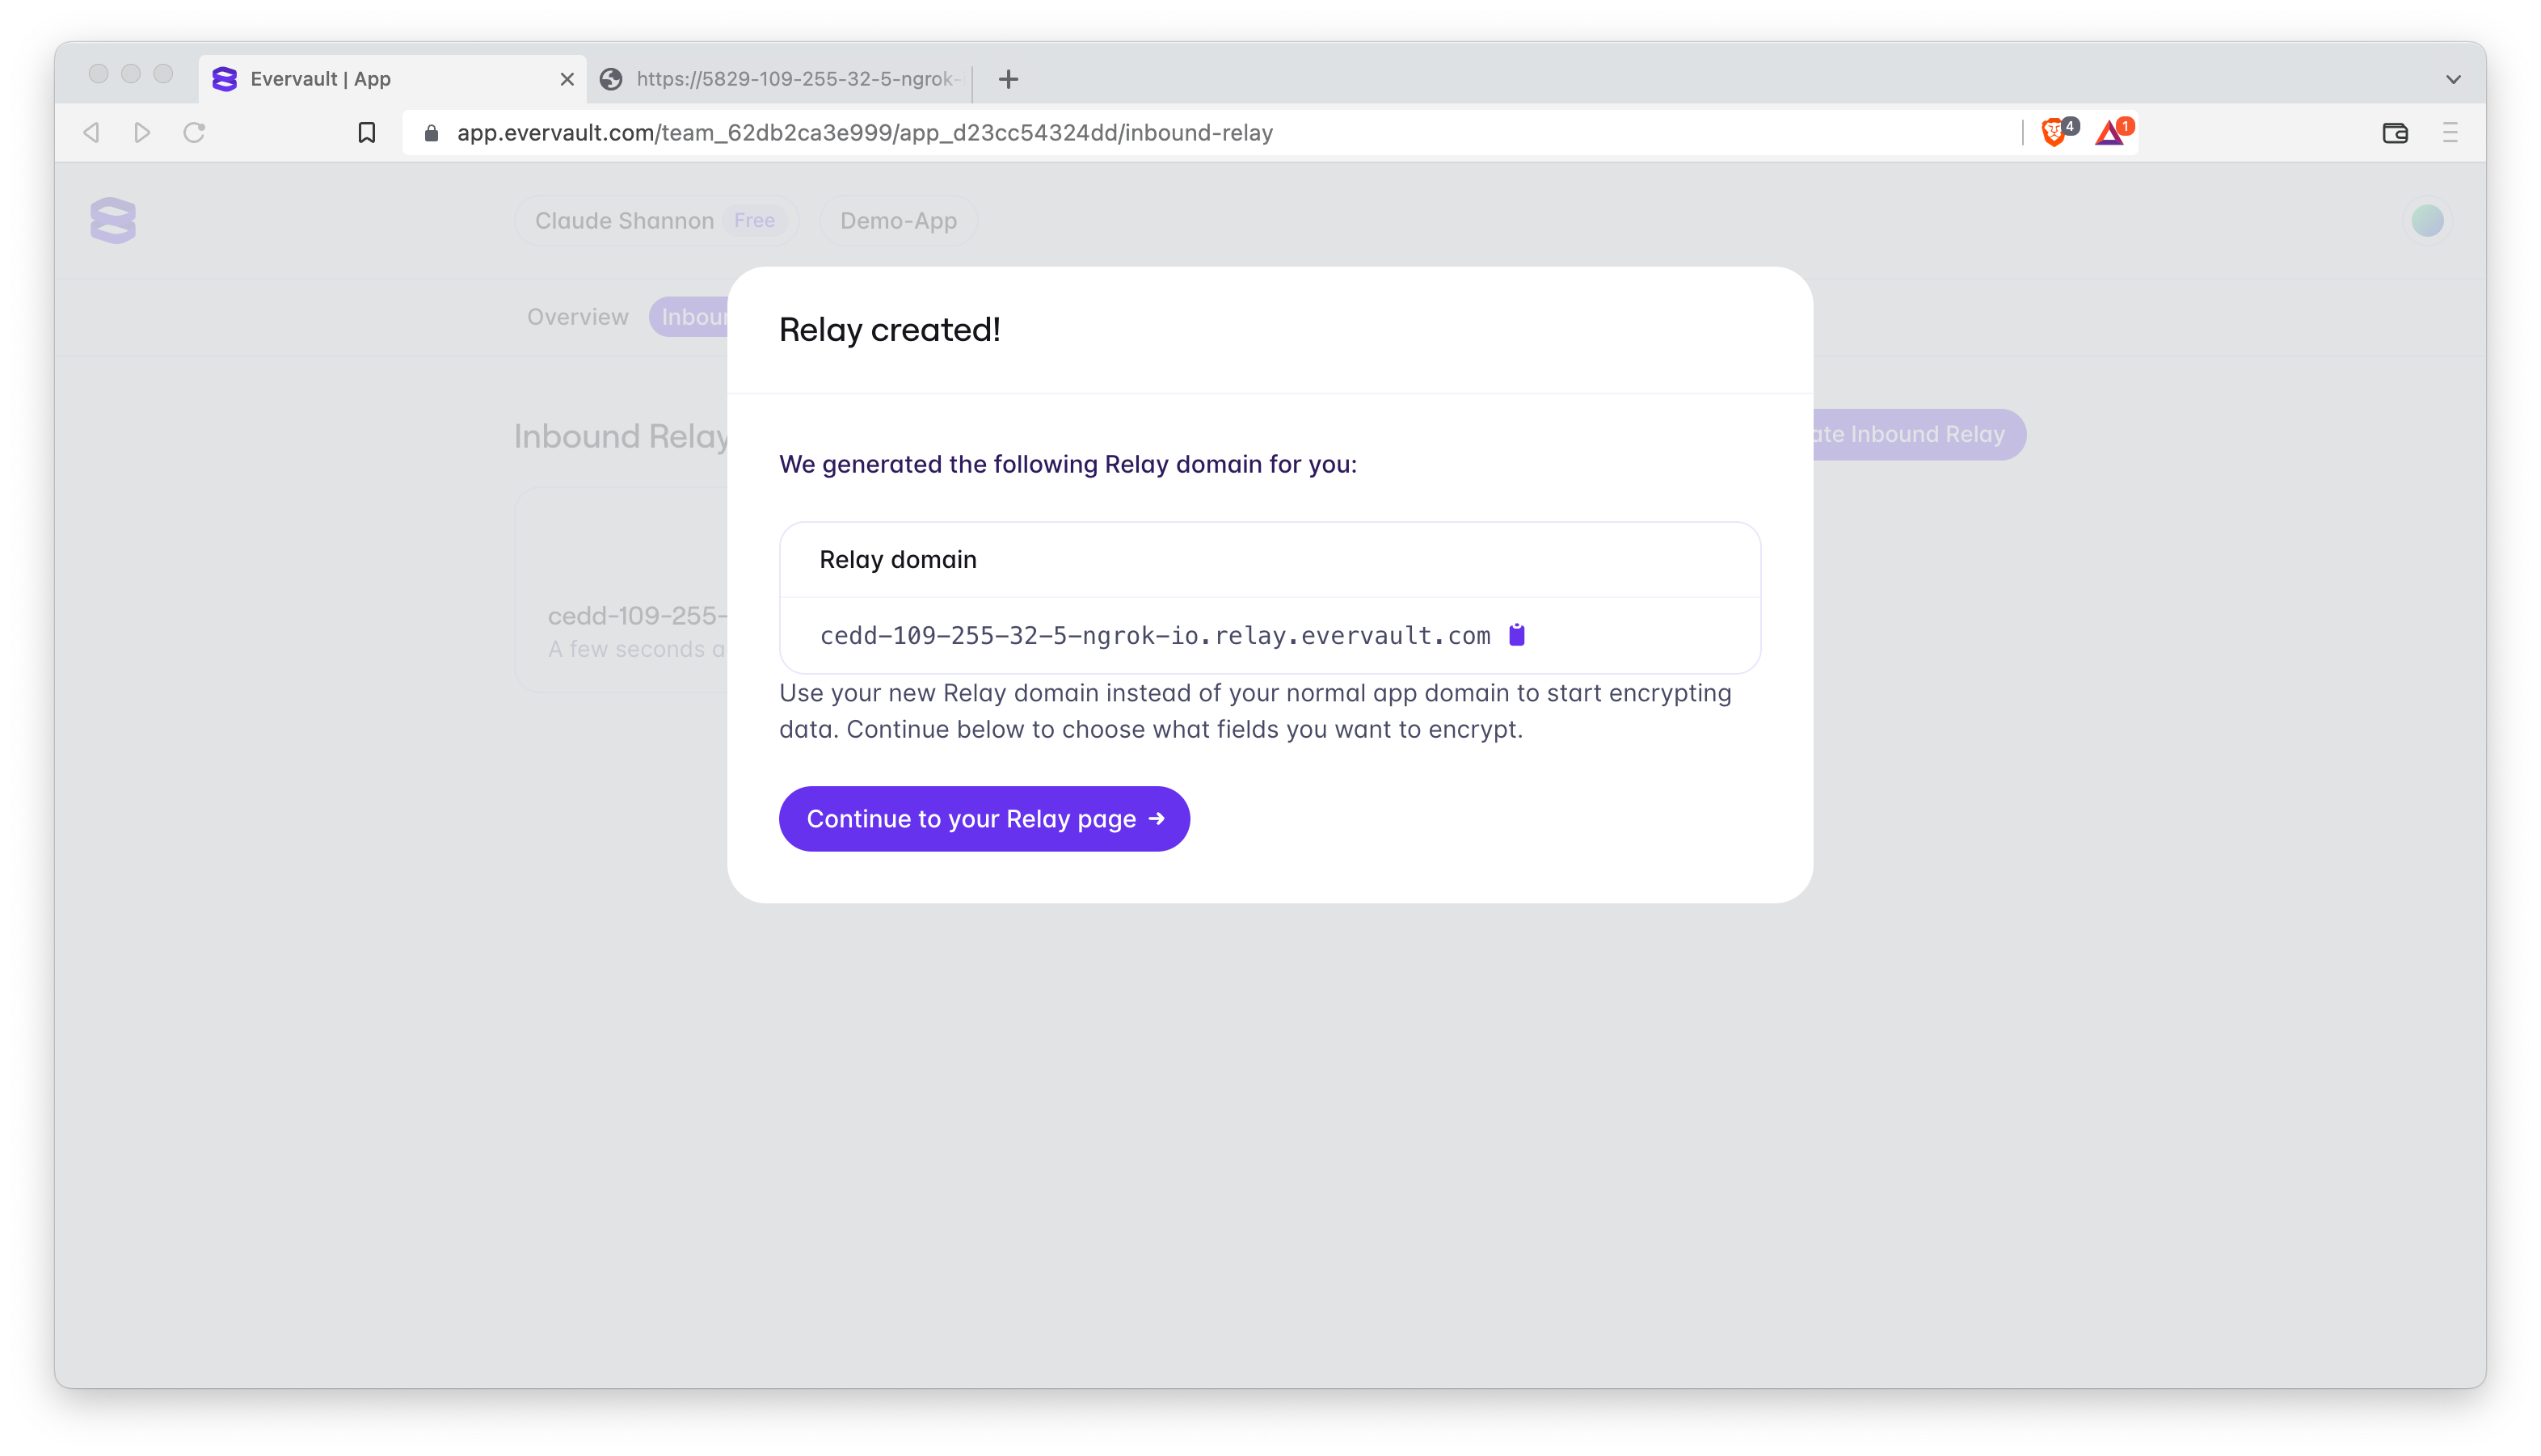
Once this is created, a Relay Domain will be generated:
Copy the address to your browser and you’ll see that the app running from your local host machine is also running at the Relay Domain.
Submit the details and you’ll see them come through to your terminal:
1mikie@Mikies-MacBook-Pro walkthrough_demo % node src
2Server listening on port 3030
3Connected to Database
4{
5  acknowledged: true,
6  insertedId: new ObjectId("632c3e3a49133092eb7e4830")
7}
8Received details {
9  fname: 'Claude',
10  sname: 'Shannon',
11  email: '0861234567',
12  phone: 'claude.shannon@evervault.com',
13  addl1: 'Exchequer Chambers',
14  addl2: '27 Exchequer Street',
15  city: 'Dublin',
16  country: 'Ireland'
17}
Now that the Inbound Relay is set up and we have our Relay Domain, we’ll select some fields to encrypt - you can choose any of the fields present; I’m going to encrypt all of them!
To encrypt fields go to the ‘Encrypted Fields’ tab in the Dashboard and hit the 'Add fields' button:
It’s worth noting that it’s possible to encrypt fields on a specific route. For this example, we’ll encrypt everything as it comes through our server.
Once you have the fields specified, submit the form again and check your terminal - you should see something like:
1{
2  acknowledged: true,
3  insertedId: new ObjectId("632c3eef49133092eb7e4831")
4}
5Received details {
6  fname: 'ev:Tk9D:5gSf1+BJu8eqrvCd:A9UdVAg0FmsbG5RwR2VrtetwKf0oSITdsVFGvrouVyQN:Z6TW4DjMXVCpcVm8SuxbHwhZV37x8g==:$',
7  sname: 'ev:Tk9D:NPYL3nbrMQtGEjm9:Aws7c0P4HrX7qzkvInp0xSFufBIaHrU7trdGWRqNpaFM:06Wk/838eZOvkmyTssbijQYBz6TTlCg=:$',
8  email: 'ev:Tk9D:CTCqAaAsXmtrG8/L:AiD45s0JL+Q5nRy7dKnjPTKcLm4HJ4m06eBO4e6tvHtD:9IBv523i+VoHbES2rq8iBBEvyFVJR19y30U=:$',
9  phone: 'ev:Tk9D:k/faOoElDaA2P6BZ:AtTuROBEi3yquxb5ikX+BSykxc8jPCMUy2n++qN1I05u:pInJZ3bJvvXV0PeTu+e6NyFQFiY+rj9v2uYIN1di5QpgYjlckgt7rZhvcjw=:$',
10  addl1: 'ev:Tk9D:ly6Obp3v1KGESYFF:AqBZvhmaAcLjeY7GMoOmhE+xm5hUcEbeIhcxJy9UX9bZ:XqsQdKk86tCN2mkHfMoTphjZSmFAfxMz+vjyG15H6vX2sA==:$',
11  addl2: 'ev:Tk9D:IwxNmnNUsgIFMg5i:AkSwKDyaMclInxSftGIC2cExfmsRlDKEmECHBbciJRaz:1gZMtJ6AUfiAS7QeXfdsOtMmCt/DS3gWVXu+CVQzMeZeWf4=:$',
12  city: 'ev:Tk9D:x25ept43yccwex07:A54RpGhHlGX7F3BEzpfWbEV0u2a8eQrYFYWtyWOhFHIc:VrUqhp9+iUfHB5lKwL/D+ypG3l02Ww==:$',
13  country: 'ev:Tk9D:E4xpKaspNCFDRGAD:AjXgHAqp+V/hdTgl3Tkow/MTe4wzb8fDJ6j1DnrOTwtI:Nmkh0TpprF0WVD49JFfh2hg38A0PHqw=:$'
14}
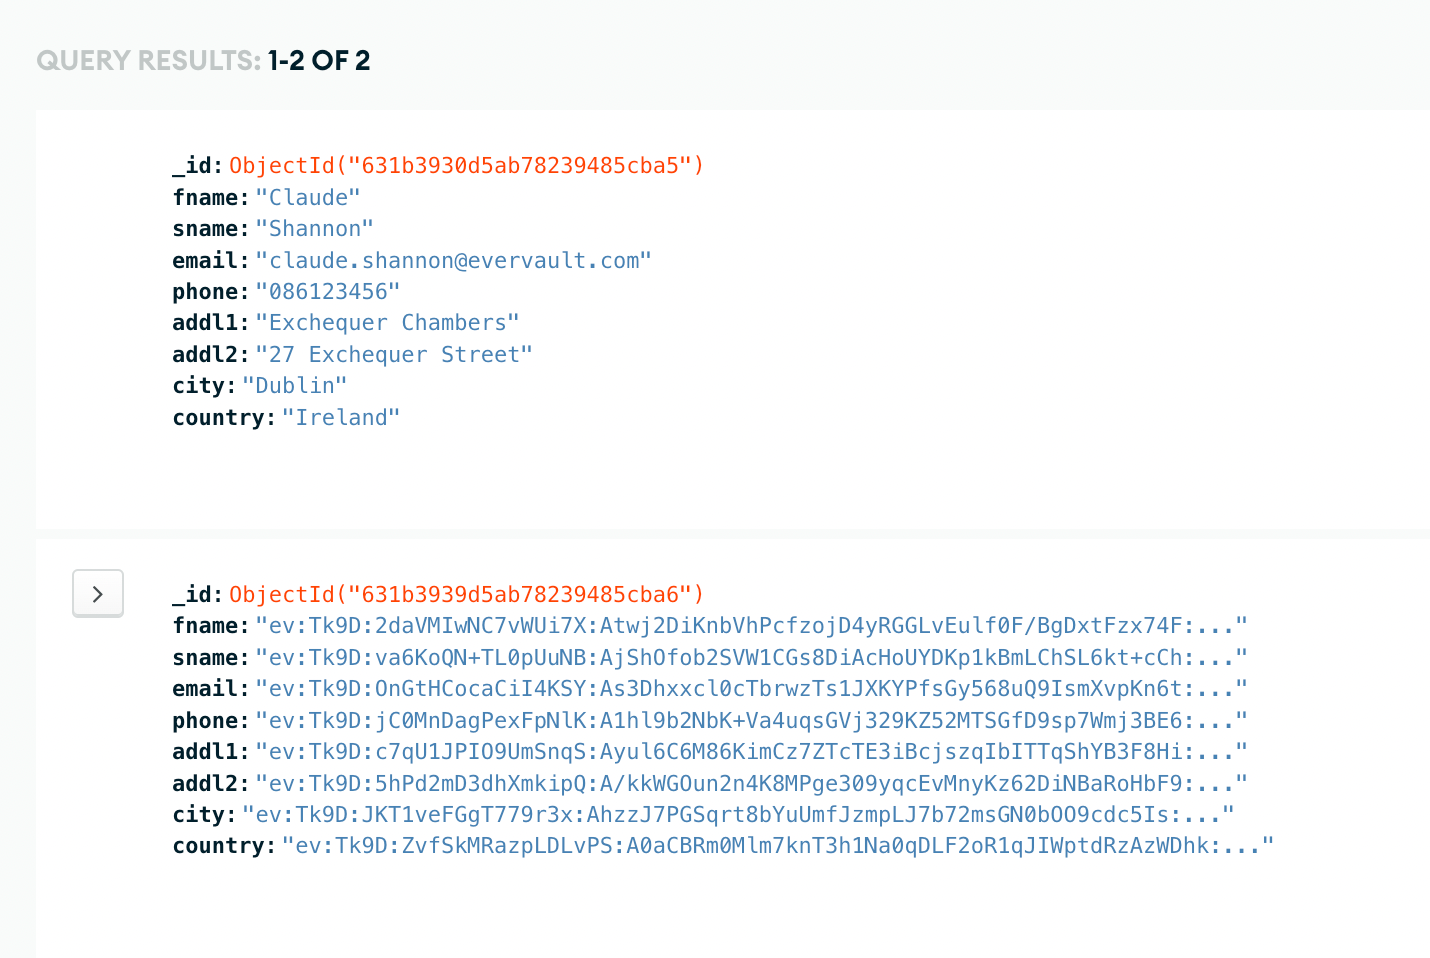
Checking our MongoDB, we can see that when the request flows through the Inbound Relay the data is encrypted and written to MongoDB as the encrypted String.
The final step is to include and initialise the Evervault SDK, this will allow any outbound requests from the server to be decrypted as they pass out of the App.
Paste this to your index.js file:
1// Including the Evervault SDK
2const Evervault = require('@evervault/sdk');
3
4// Initializing the Evervault SDK
5const evervault = new Evervault(process.env.EVERVAULT_API_KEY);
5. Reading encrypted data
Now that data is being written to the database, we need to have a way to pull and display it.
We need to include the ability to create GET requests within the app.
Update the index.html file to include a new button that, when clicked, will take all the data sent to the database and displays it in our browser.
To do so, you need to include a <div> that will house the button. Add the following block below the </section> in your code.
1<div>
2  <form id="display">
3    <p><button class="get" style="position:relative; right:-22.5px;width:99px">Get Details</button></p>
4    <pre id="response">
5    </pre>
6  </form>
7</div>
Once this has been added, we’ll need to include a script that runs when the button is pressed.
1<script>
2// When the form is submitted, run this code
3// to handle sending the data as JSON to the API
4  document
5    .getElementById('display')
6    .addEventListener('submit', async (event) => {
7// Override the default browser settings for handling forms
8      event.preventDefault();
9// Send a GET request to https://{this URL}/user with the name and phone number encoded in JSON
10      const res = await fetch('/user', {
11        method: 'GET',
12        headers: {
13          'Content-Type': 'application/json',
14        }
15       });
16// Take the response from the API and parse it as JSON
17      const data = await res.json();
18      console.log(data)
19      document.getElementById("response").innerHTML = JSON.stringify(data, undefined, 4);
20    });
21</script>
Now that index.html has been updated, update index.js.
Within the Mongo promises callback, add the following code snippet for the getcommand to pull out all of the data submitted via the form.
1app.get('/user', async (req, res) => {
2  try {
3    const result = await mongocolletion.find().toArray();
4    res.send(result)
5    console.log('Displaying details')
6  } catch (err) {
7    console.error(err);
8  }
9})
The full code for index.js is:
1// Include Express.js, a library for easily building APIs in Node.js
2const express = require('express');
3
4// Create an Express.js application
5const app = express();
6//Include the variable for mongodb
7const mySecret = process.env['MONGO_DB_URL']
8
9// Serve static files from the public folder (that we'll create later)
10app.use(express.static('public'));
11
12// Return middleware that only parses POST JSON requests and only looks at requests where the Content-Type header matches the type option
13app.use(express.json());
14
15//Adding reqs for mongo
16const MongoClient = require('mongodb').MongoClient
17
18//Connecting to the Mongo Db
19MongoClient.connect(mySecret, { useUnifiedTopology: true })
20  .then(client => {
21  console.log('Database Connected')
22
23//setting the constants for the db
24//This is naming the database within Mongo
25  const db = client.db('demo2')
26//This is naming the collection within the database that will store what is being written
27  const mongocolletion = db.collection('form2')
28
29//Taking the data from the intake HTML Form
30  app.post('/user', async (req, res) => {
31    const { fname, sname, phone, email, addl1, addl2, city, country } = req.body;
32//writing the data to the DB
33    try {
34     const result = await mongocolletion.insertOne(req.body);
35     console.log(result);
36     console.log('Received details', { fname, sname, email, phone, addl1, addl2, city, country })
37    } catch(err) {
38     console.error(err);
39    }
40  })
41  app.get('/user', async (req, res) => {
42    try {
43      const result = await mongocolletion.find().toArray();
44      res.send(result)
45      console.log('Displaying details')
46    } catch (err) {
47      console.error(err);
48    }
49  })
50})
51
52// Start this app as an Express.js server on port 3030
53app.listen(3030, () => {
54  console.log('Server listening on port 3030');
55});
Save your file and run node src from the root directory of your project.
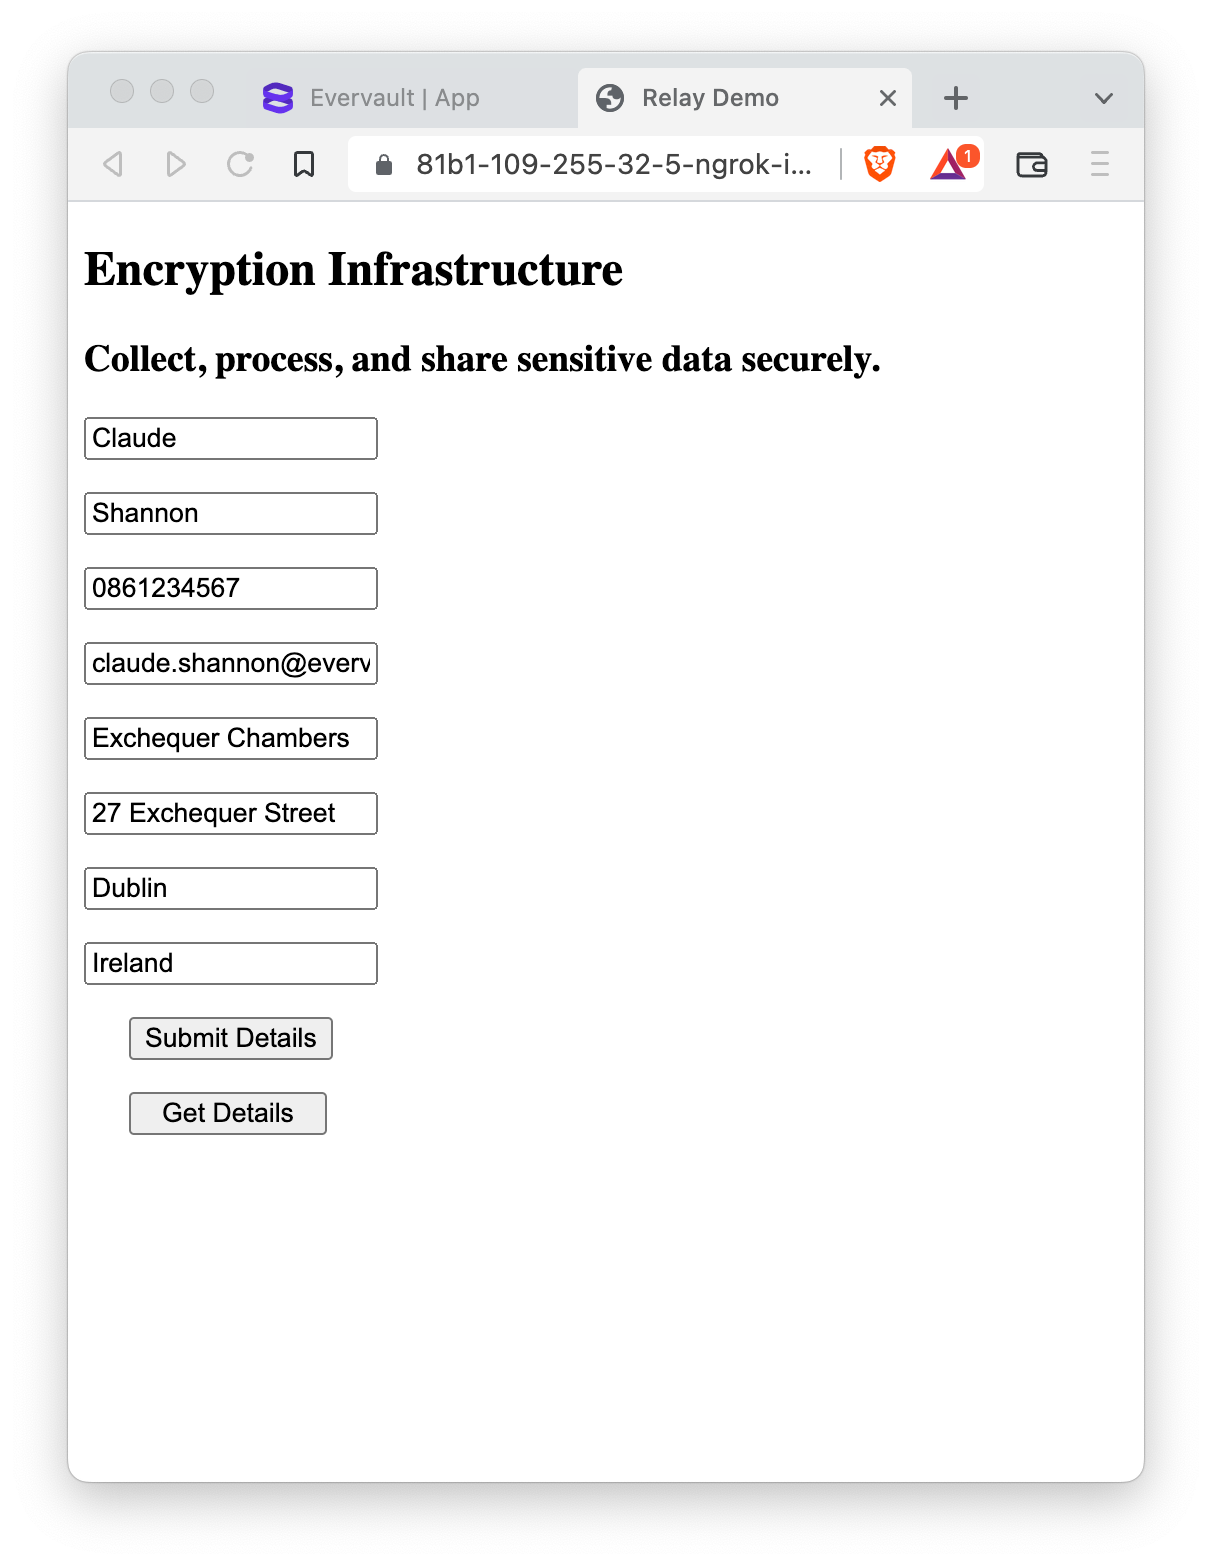
Go to your Relay Domain:
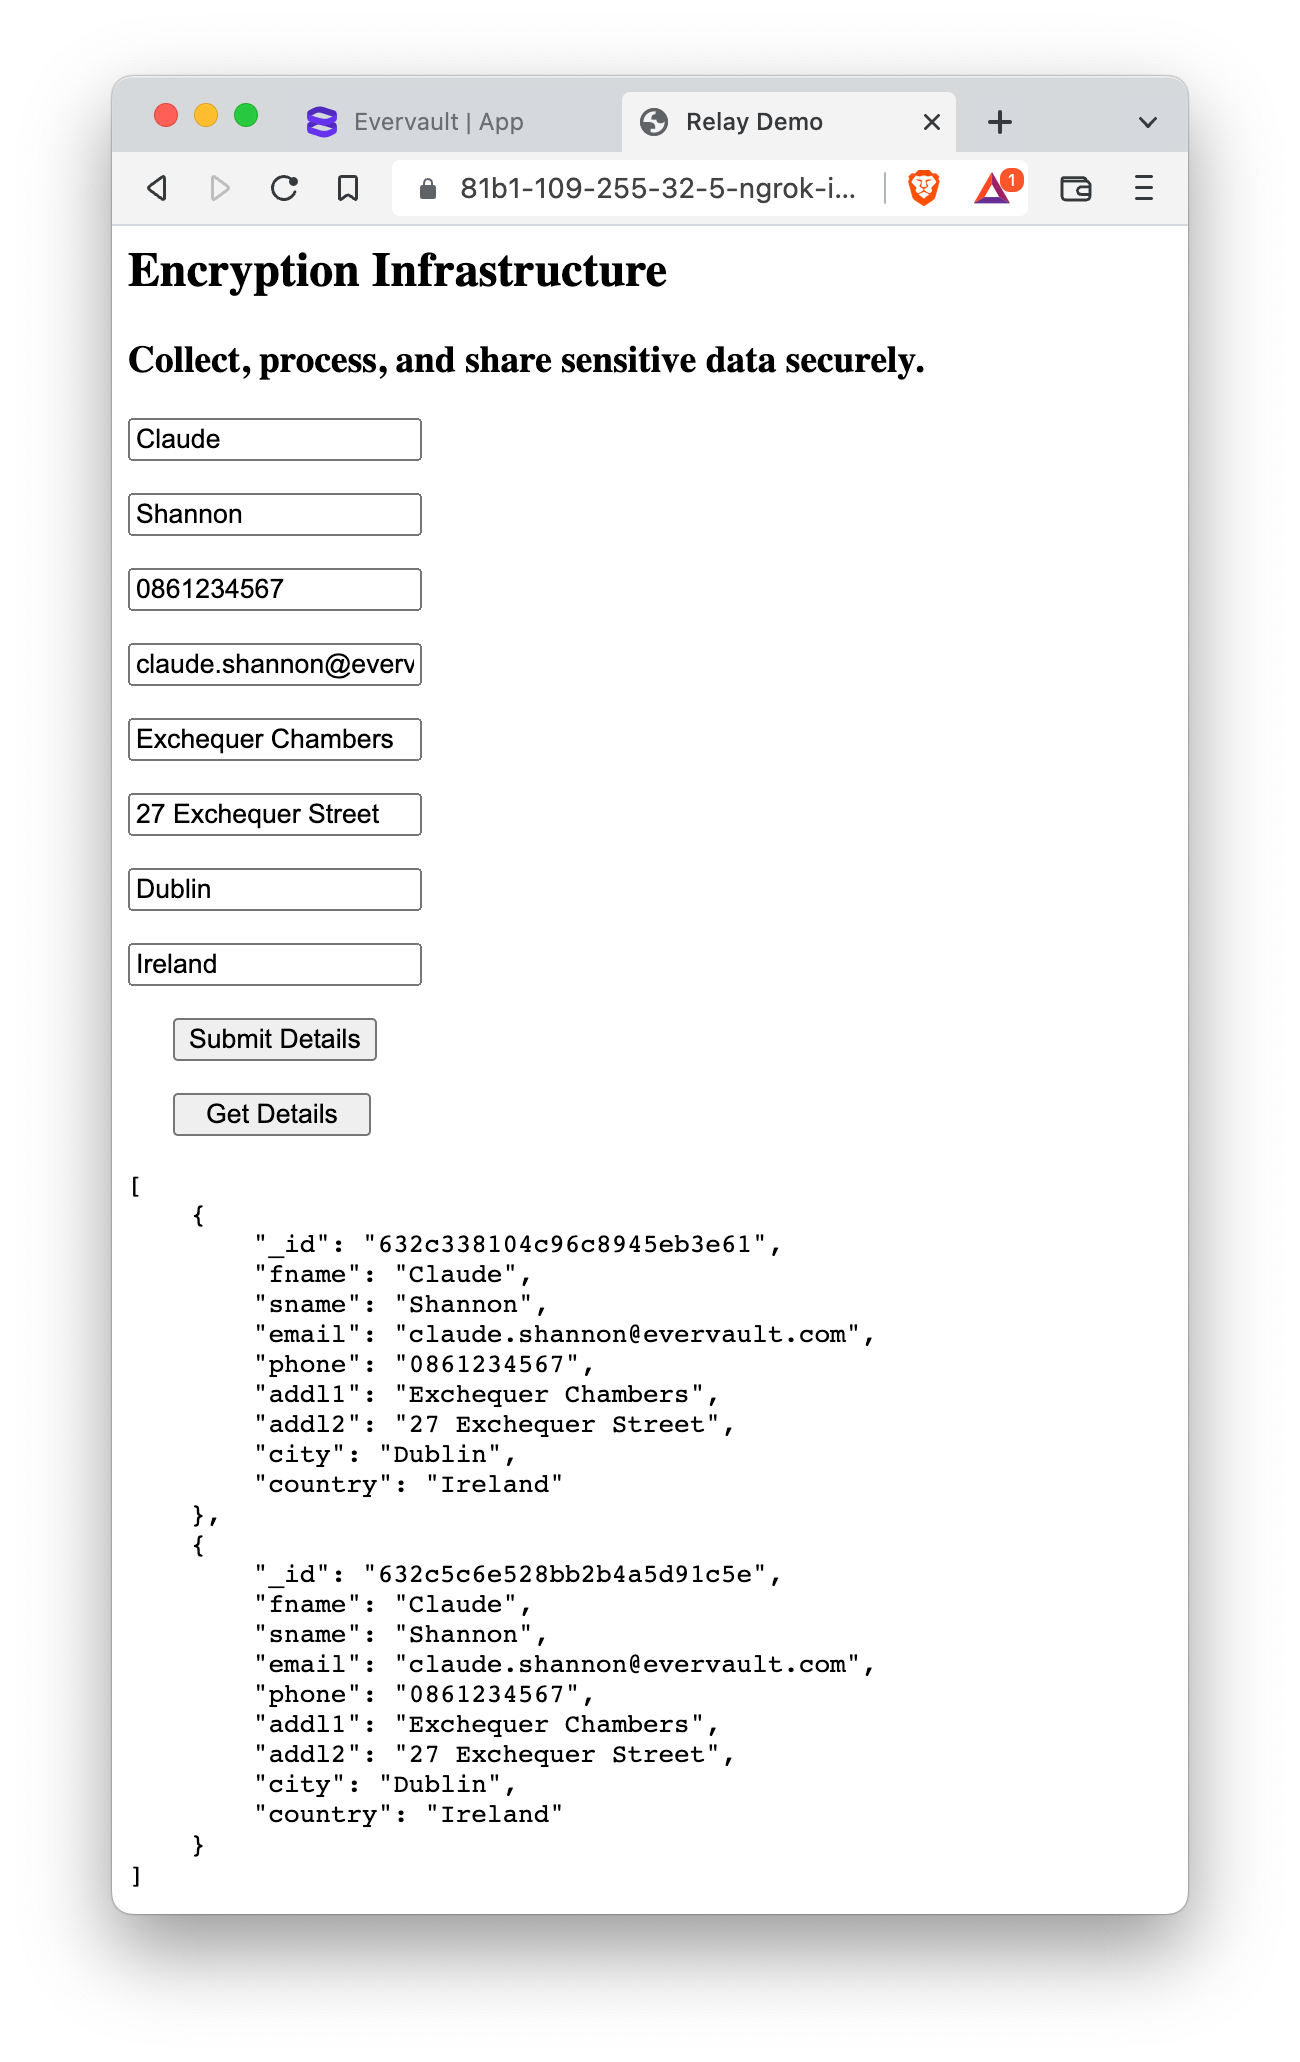
When you hit ‘Submit Details’, you’ll see the Evervault encrypted strings on your server. If you press the ‘Get Details’ button, you’ll see both requests are unencrypted!
You’ve Now Achieved Field Level Encryption
Using Inbound Relay, you've ensured that plaintext data never hits your servers, securing your sensitive data.
Stay tuned for the second part of this demo, where we'll show you how to encrypt data in a sign-up flow!
Ready to get started with Evervault? Get started with a free account.


 Shane Curran