- February 08, 2024
How we built Enclaves: Routing Traffic with Consul

Dónal Tuohy
Engineer
Evervault Enclaves make it straightforward for users to deploy their apps into a trusted execution environment. A crucial part of this process is ensuring that it is easy to send a request to your Enclave once it is active. In this post, we’ll talk about our initial use of Amazon Cloudmap for service discovery, outline the challenges we encountered and explain our migration to Consul.
What is Cloudmap, and why did we start with it?
Cloudmap is a managed service offered by AWS that you can use to maintain a map of your services for DNS lookups or service discovery API calls. We use AWS Elastic Container Service (ECS) to deploy our containers, which integrates out of the box with Cloudmap. This setup allows us to register our containers with Cloudmap, choosing between private or public namespaces based on our needs. We use Cloudmap across Evervault to allow our services to talk to each other, and we felt it would fit the bill for Enclaves.
Spoiler: It didn’t.
What was Cloudmap’s role for Enclaves?
The implementation of Cloudmap with Enclaves looked like this:
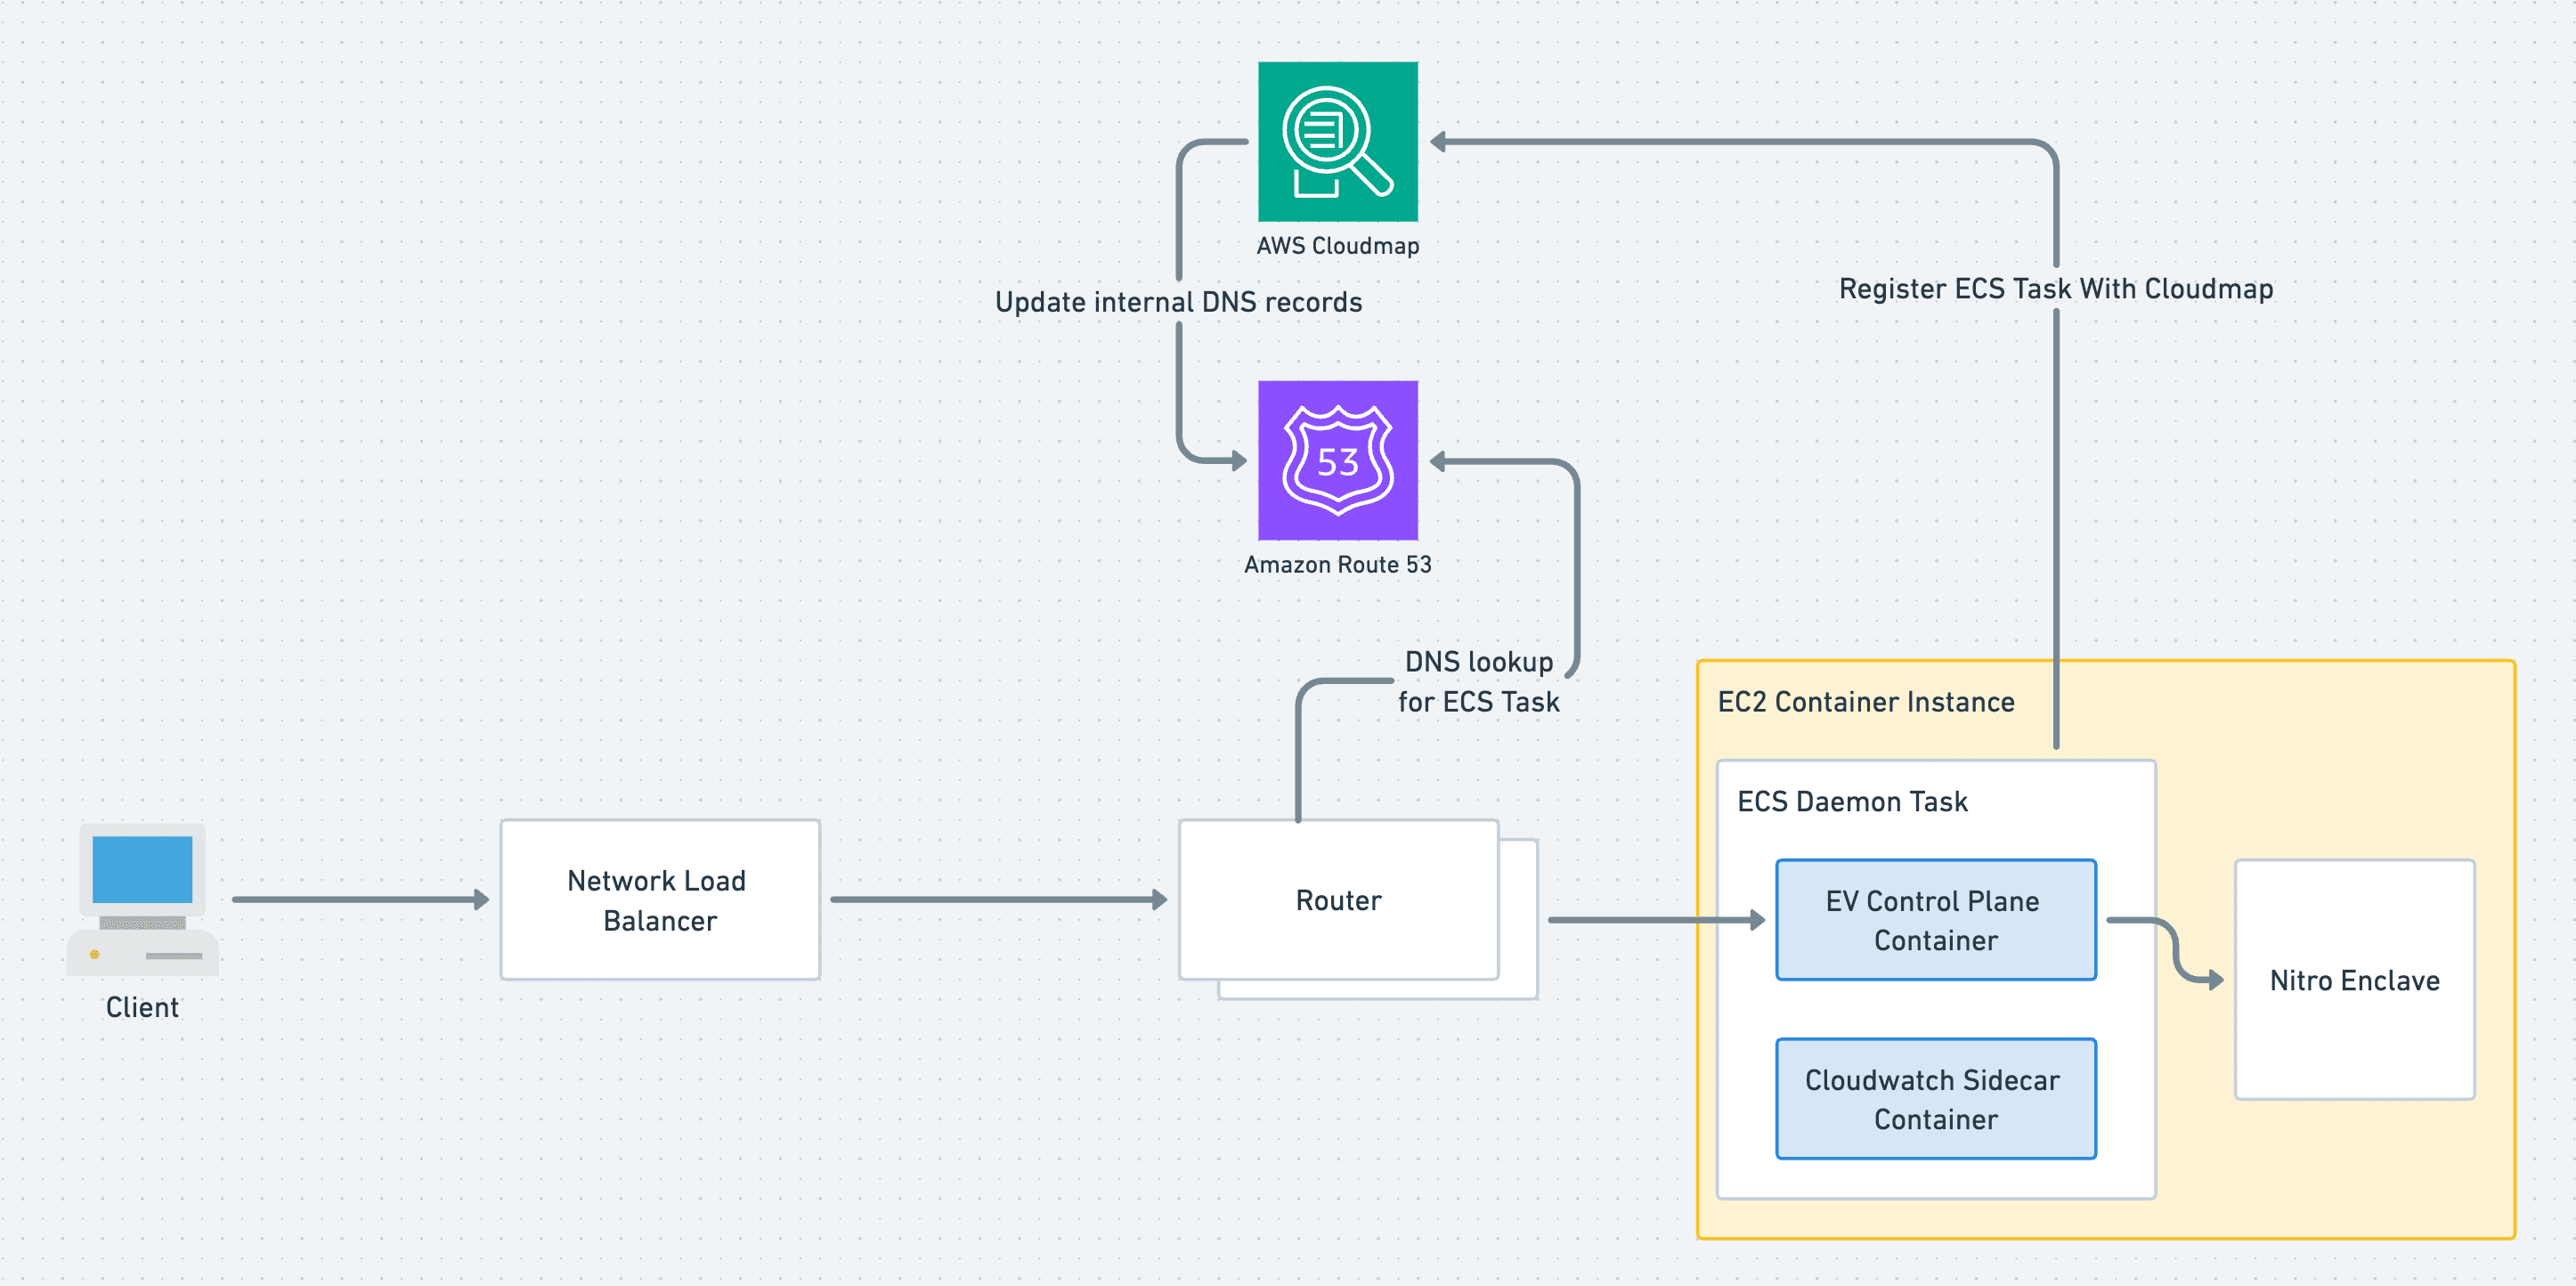
For each new Enclave, ECS would spin up a service and assign it a Cloudmap service, linking it to our domain. The IP addresses of these ECS containers would then be discoverable through DNS queries. This initially worked well with DNS queries making the ECS container IPs easily discoverable. However, as time passed, we noticed a significant issue with the timing of the DNS updates, leading to downtime during Enclave deployments.
Looking for a quick fix
Digging into it more, we found two closely related significant issues:
- Premature traffic routing: Traffic was routed to an Enclave before it was ready to accept any requests.
- Delayed traffic routing: Conversely, traffic continued to be sent to an Enclave, even after it had been shut down.
Given that TLS is terminated in the Enclave, these timing issues result in a nasty TLS error for the end user during the downtime.
We looked into fine-tuning our setup to fix these timing issues. We started by looking at the “Routing Policy'' set on the Cloudmap services. We had initially configured it to use Multivalue Routing. This means DNS requests will be responded to with up to 8 healthy IPs of the service. There’s an issue here as the health checks determining the service availability are based on Route53 checks and not ECS container health checks. This meant Cloudmap was never aware of the unhealthy instances when providing IPs. We tried to add Route53 health checks, but this isn’t supported for private IPs:
An error occurred (InvalidInput) when calling the UpdateService operation: Health check config cannot be applied to a service with private namespace
Service Connect initially seemed promising, offering service discovery via Envoy proxy sidecars which have a custom integration with the ECS control plane. It looked to be a really nice improvement. The only problem was that it didn’t support our particular use case, with TLS traffic being routed directly into the Enclave, so we had to go back to the drawing board.
Enter Consul
As there was no immediate fix available, we had to start thinking about larger solutions. We first looked at hand-rolling our own custom service discovery, but there was absolutely no point in re-inventing the wheel. Service Discovery isn’t a new idea. Looking at existing solutions, we ended up landing on Consul provided by Hashicorp. Consul is like a Swiss Army Knife for distributed systems. With Consul, you can set up stuff like access control, service mesh, key/value storage or, most importantly for us, service discovery. What is nice about Consul is that you can use their tried and tested service discovery offering without the overhead of a full-blown service mesh. Consul is also open source so we were able to deploy it in our own infrastructure.
At a high level, there are two main players in Consul service discovery - A cluster of servers and an agent for each node that wants to register with the Consul cluster. The job of each is as follows:
- Servers: These are the backbone of the Consul ecosystem. They maintain the central Consul state, which stores all the crucial data about the services, nodes and health checks of each node in the system. When updates are received from one agent, the state will be updated, and every agent in the system will get the update.
- Agents: These are deployed as sidecars alongside a main container. They’re responsible for registration with the Consul servers and checking the health of your application. All agents keep their own local state of the cluster. Any changes in health status get reported back up to the servers, which then propagate it out to all sidecars. This way, when one of your internal apps needs to know where another app is, it can simply query its own consul sidecar for the address of the other app.
Implementation for Enclaves
After a spike into Consul, we decided it was best for the job at hand and went about implementing it. Our setup has a number of moving parts, so I’ll break down each part to provide a clearer understanding of how it all comes together.
Consul Servers
The server cluster works using the Raft consensus protocol, which allows the servers in a cluster to elect a leader themselves. (Here’s a cool site with a graphic example of a leader election using raft.) For write operations, such as leader elections or service updates, Consul requires a quorum. A quorum is the minimum number of members in the cluster that must be available for the cluster to accept writes. The quorum is calculated as:
`(number of server nodes / 2) + 1`
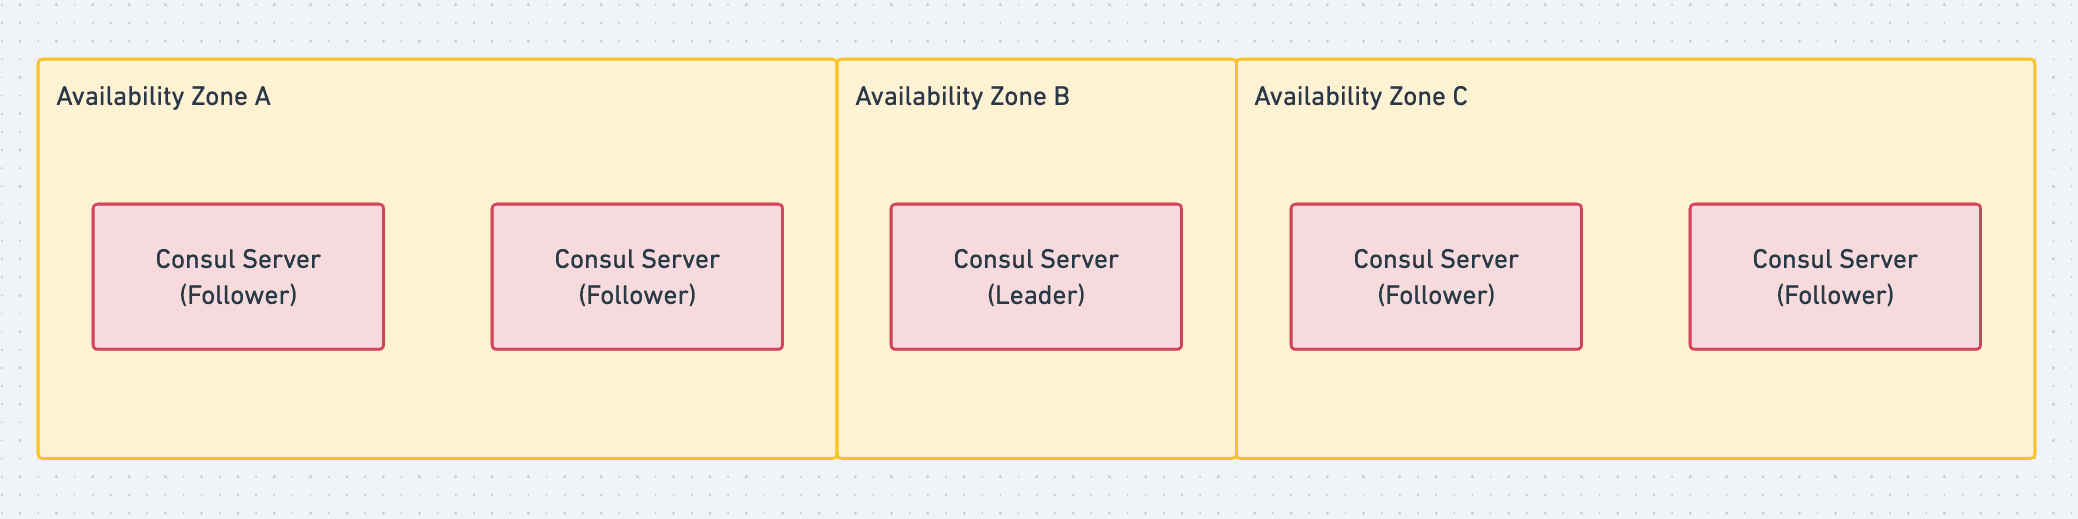
Hashicorp recommends having 3 or 5 nodes in your Consul cluster so you can still maintain a quorum if a member fails. They recommend an odd number so there will always be a majority, and the cluster can’t suffer from split-brain. We went with 5 nodes in the cluster divided across 3 Availability Zones (AZ). This meant an AZ had no more than two Consul servers, and we could tolerate an AZ going down and still maintain a cluster quorum.
To deploy the Consul servers, we have an Amazon Machine Image (AMI) and Launch Template with our specific Consul configuration file written. We then use this Launch Template to create an Auto Scaling Group of Instances in our VPC which provisions EC2 instances to run with our desired configuration. The Consul binary is configured to run as a systemd process on the Instance and automatically starts on bootup.
We also enabled consul UI which can simply be turned on with one config flag. This provides a straightforward, user-friendly view of the state of the cluster’s overall health and allows us to check the status of each registered service and node easily.
Consul Agents
The Consul agent configuration has to be more dynamic than the servers. Each time an Enclave spins up, it brings a new Consul agent into play, acting as a dedicated sidecar for that specific instance. To do this, we created our own custom Consul container for the Consul agent. Leveraging Jsonnet, we dynamically populate the Consul configuration with the necessary Enclave detail.
The heart of the agent configuration lies in the service settings, where we specify how to register each unique Enclave service. This can be done through an API call but we opted for putting it in the config file as we have all the required info on startup. We were also able to add a custom health check here using the health check configuration block. This gives us so much more control over health checks compared to when using Cloudmap. You are able to specify settings such as `success_before_passing`, `interval` and `deregister_critical_service_after`, which gives us the precision to direct traffic to an Enclave only when it is up and running.
Locating the Consul server cluster is also quite handy. We initially had a custom script that would use the EC2 API to get the Consul server cluster IPs to register with the correct cluster. However, we discovered that Hashicorp offers a built-in solution for cloud environments that massively simplifies this process. By granting a few extra IAM permissions, our agents can automatically identify and connect to the server cluster on startup.
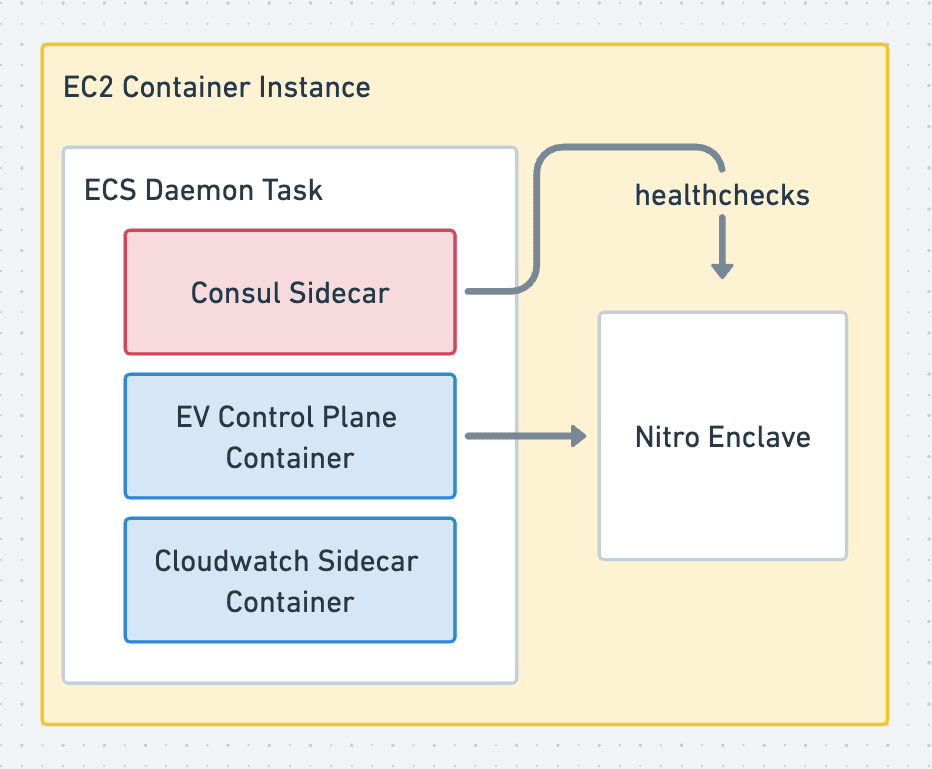
We also upgraded this custom Consul agent container with self-healing capabilities through container health checks. These checks frequently check the Enclave is correctly registered with Consul by querying the service catalog on the sidecar. If an Enclave becomes unregistered, indicating it’s no longer discoverable and not receiving traffic, the health check triggers the container to terminate. This prompts the whole ECS task to be restarted and attempt to rejoin the Consul cluster.
With all this, adding the custom agent container into the ECS control plane task definition was all that was left.
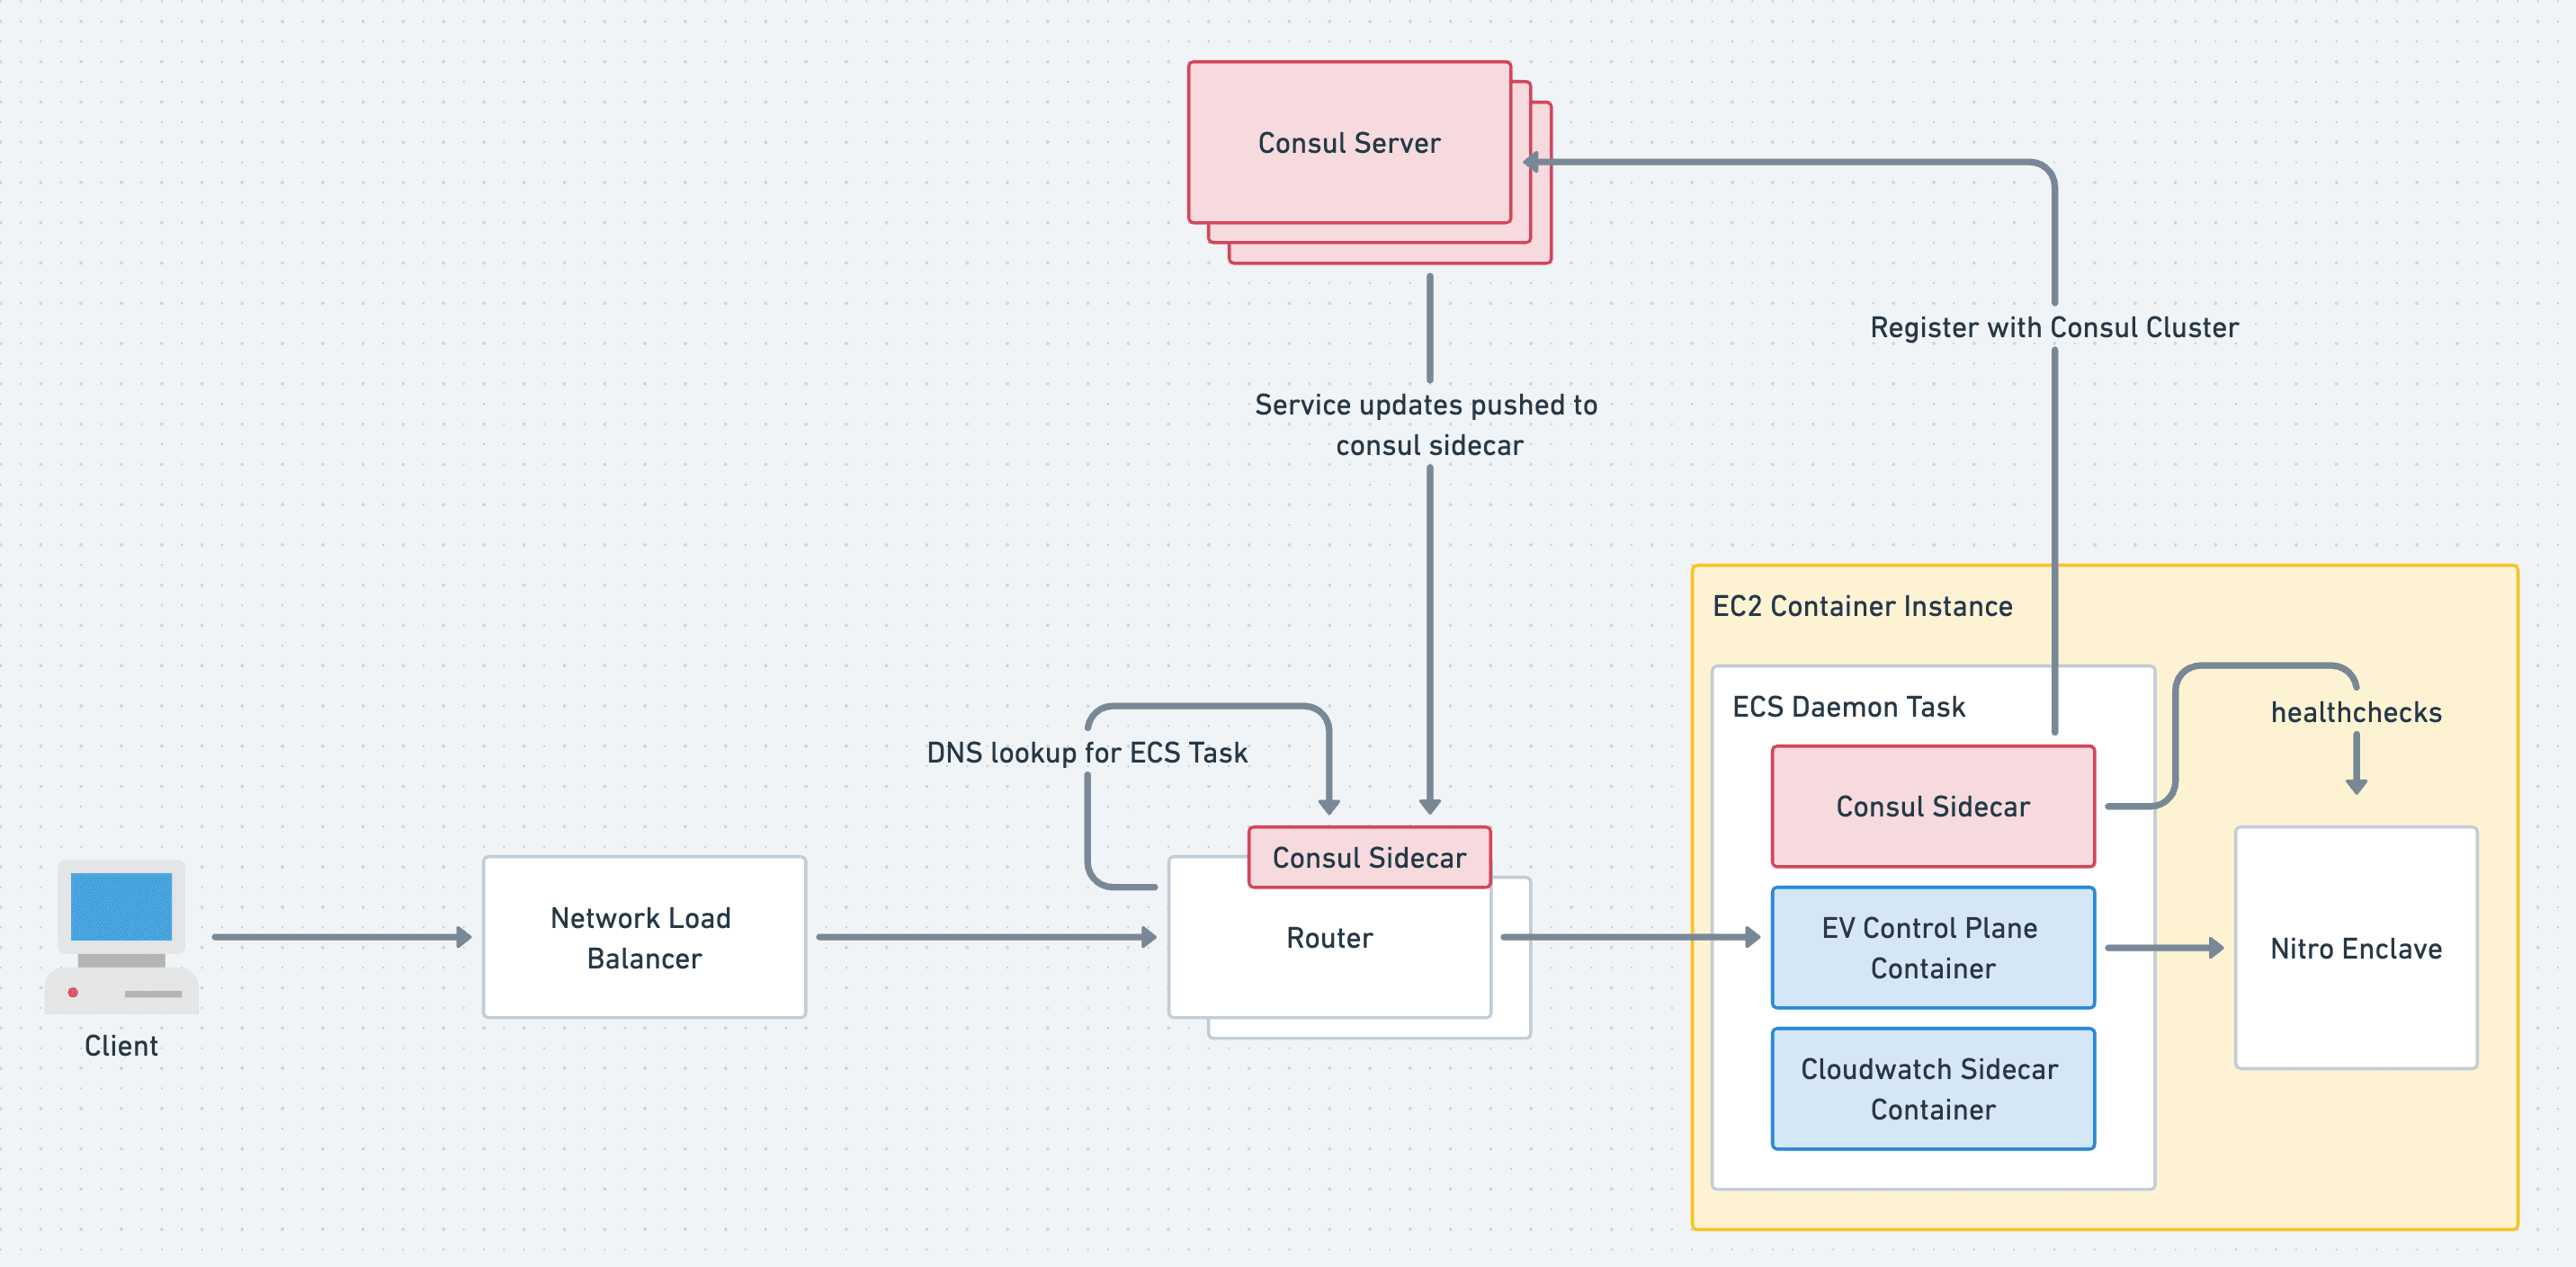
The Big Picture
With the Server cluster and agents coming together, we have a pretty robust service discovery system, as shown in Figure 4. Picture this: a request for an Enclave called “super-secret” headed for`super-secret.enclave.evervault.com` is sent from a client. This hits our frontend router, which peeks at the SNI header of the request, pulls out the enclave name and consults its local Consul sidecar with a DNS query for `super-secret.service.consul`. This gives it the IP of the Enclave’s ECS task and directs the TLS stream right where it needs to into the Enclave where TLS termination takes place. Happy days!
Did this solve the downtime dilemma?
Yes! Not only did Consul remove the downtime associated with Enclave deployments; it gave us more control over the internal routing of the Enclaves system and more visibility into the status of each individual Enclave. All in all, adding Consul was a bit more work up front, but it’s widely used, documented well and has a helpful community around it. Once integrated, it’s a really useful tool to have in your system. If you would like to read more about Consul, the documentation is very good.
Try out Evervault Enclaves
Get started today, simply create an Evervault account and start your free trial of Enclaves. Deploy and attest your first secure Enclave using three commands from the Evervault CLI.
Learn more